[安装] Doris集群搭建环境
参考文献
| 参考链接 | 推荐指数 |
| Doris集群安装部署(详细) | [火][火][火][火][火] |
| Doris学习笔记之数据表的创建 | [火][火][火] |
| doris官网0.15版本的安装部署 | [火][火][火][火][火] |
| Doris0.15升级到1.1.1 | [火][火][火][火][火] |
| [说明] Doris使用培训 | [火][火] |
本文以Doris集群安装部署(详细) 的链接文章为主
一、系统准备工作
【必须】关闭交换分区(swap):https://www.cnblogs.com/whm-blog/p/10920881.html
【必须】 时钟同步:https://www.cnblogs.com/jhxxb/p/11526098.html
【必须】把limits调到最大:linux中的limits.conf文件配置 - 简书
【必须】安装JDK1.8:https://blog.csdn.net/weixin_36365168/article/details/114194870
当前系统环境
操作系统:centos 7.6 ,确认系统支持ext4文件系统
二、安装过程
2.1 doris集群节点角色规划
| IP | 节点名称 | 备注 |
| 172.18.8.205 | fe-foller、be | |
| 172.18.8.207 | fe-master、be | |
| 172.18.8.208 | fe-foller、be | |
| 172.18.8.209 | be |
选择doris版本为1.1.1 的版本
2.2 doris的安装方式
-
使用doris源码编译安装
-
使用doris的二进制安装包安装(本次安装选择这个)
安装方式选择:关于两种方式的选择,使用源码安装可以在系统环境与选择二进制安装所依赖的底层操作系统差异很大的情况下,直接使用源码编译的方式,成功率更高;如果与doris官方要求的依赖环境接近,可以直接使用二进制的安装更快速、便捷;
2.3 安装FE
创建fe的数据目录:
#创建fe的元数据的目录,是前端查询的元数据所在位置
mkdir -p /data/doris/doris-meta
#创建fe启动的日志目录
mkdir -p /data/doris/fe/log
将安装目录中的fe目录拷贝到指定的doris安装家目录,对fe进行配置
#doris的安装目录
/opt/app/doris/fe
修改对应fe的配置文件,fe.conf
# the output dir of stderr and stdout
LOG_DIR = /data/doris/fe/log

DATE = `date +%Y%m%d-%H%M%S`
JAVA_OPTS="-Xmx32768m -XX:+UseMembar -XX:SurvivorRatio=8 -XX:MaxTenuringThreshold=7 -XX:+PrintGCDateStamps -XX:+PrintGCDetails -XX:+UseConcMarkSweepGC -XX:+UseParNewGC -XX:+CMSClassUnloadingEnabled -XX:-CMSParallelRemarkEnabled -XX:CMSInitiatingOccupancyFraction=80 -XX:SoftRefLRUPolicyMSPerMB=0 -Xloggc:$DORIS_HOME/log/fe.gc.log.$DATE"

# For jdk 9+, this JAVA_OPTS will be used as default JVM options
JAVA_OPTS_FOR_JDK_9="-Xmx32768m -XX:SurvivorRatio=8 -XX:MaxTenuringThreshold=7 -XX:+CMSClassUnloadingEnabled -XX:-CMSParallelRemarkEnabled -XX:CMSInitiatingOccupancyFraction=80 -XX:SoftRefLRUPolicyMSPerMB=0 -Xlog:gc*:$DORIS_HOME/log/fe.gc.log.$DATE:time"

##
## the lowercase properties are read by main program.
##

# INFO, WARN, ERROR, FATAL
sys_log_level = INFO

# store metadata, must be created before start FE.
# Default value is ${DORIS_HOME}/doris-meta
#  meta_dir = ${DORIS_HOME}/doris-meta
meta_dir = /data/doris/doris-meta

http_port = 8130
rpc_port = 9020
query_port = 9030
edit_log_port = 9010
mysql_service_nio_enabled = true
## 在这里加该配置就行
enable_http_server_v2 = true


# Choose one if there are more than one ip except loopback address.
# Note that there should at most one ip match this list.
# If no ip match this rule, will choose one randomly.
# use CIDR format, e.g. 10.10.10.0/24
# Default value is empty.
# priority_networks = 10.10.10.0/24;192.168.0.0/16
priority_networks = 172.18.8.207/24

# Advanced configurations
# log_roll_size_mb = 1024
# sys_log_dir = ${DORIS_HOME}/log
# sys_log_roll_num = 10
# sys_log_verbose_modules = org.apache.doris
# audit_log_dir = ${DORIS_HOME}/log
# audit_log_modules = slow_query, query
# audit_log_roll_num = 10
# meta_delay_toleration_second = 10
# qe_max_connection = 1024
# max_conn_per_user = 100
# qe_query_timeout_second = 300
# qe_slow_log_ms = 5000


# add by fangct
dynamic_partition_enable = true
enable_concurrent_update = true
注意:其中由于端口冲突,将http server的端口由8030,改为 8130
启动fe服务;
#启动fe服务
/opt/app/doris/fe/bin/start_fe.sh --daemon

#查看日志输出是否有错误
more /data/doris/fe/log/fe.out
其他节点上一样执行:
./start_fe.sh --helper 172.18.8.207:9010 --daemon集群回滚错误操作(禁止操作,否则清空所有元数据):
rm -rf /data/doris/doris-meta/*
rm -f /data/doris/fe/log/*
将其他的fe的服务节点加入已有的最早启动的fe节点监听中
mysql>  ALTER SYSTEM ADD FOLLOWER "172.18.8.205:9010";
mysql>  ALTER SYSTEM ADD FOLLOWER "172.18.8.208:9010";
如下是执行状态:
[root@hadoop04 ~]# mysql -h 172.18.8.207 -P 9030 -uroot
Welcome to the MySQL monitor.  Commands end with ; or \g.
Your MySQL connection id is 0
Server version: 5.1.0 Doris version 0.15.5-d987afe9d0

Copyright (c) 2000, 2021, Oracle and/or its affiliates.

Oracle is a registered trademark of Oracle Corporation and/or its
affiliates. Other names may be trademarks of their respective
owners.

Type 'help;' or '\h' for help. Type '\c' to clear the current input statement.

MySQL [(none)]> ALTER SYSTEM ADD FOLLOWER "172.18.8.205:9010";
Query OK, 0 rows affected (0.02 sec)

MySQL [(none)]> ALTER SYSTEM ADD FOLLOWER "172.18.8.208:9010";
Query OK, 0 rows affected (0.01 sec)

MySQL [(none)]> show proc '/frontends';
+---------------------------------+--------------+----------+-------------+----------+-----------+---------+----------+----------+------------+------+-------+-------------------+---------------------+----------+---------------+-------------------+------------------+
| Name                            | IP           | HostName | EditLogPort | HttpPort | QueryPort | RpcPort | Role     | IsMaster | ClusterId  | Join | Alive | ReplayedJournalId | LastHeartbeat       | IsHelper | ErrMsg        | Version           | CurrentConnected |
+---------------------------------+--------------+----------+-------------+----------+-----------+---------+----------+----------+------------+------+-------+-------------------+---------------------+----------+---------------+-------------------+------------------+
| 172.18.8.208_9010_1661842556420 | 172.18.8.208 | hadoop03 | 9010        | 8130     | 0         | 0       | FOLLOWER | false    | 1240020905 | true | false | 0                 | NULL                | true     | got exception | NULL              | No               |
| 172.18.8.207_9010_1661842351608 | 172.18.8.207 | hadoop02 | 9010        | 8130     | 9030      | 9020    | FOLLOWER | true     | 1240020905 | true | true  | 67                | 2022-08-30 14:56:02 | true     |               | 0.15.5-d987afe9d0 | Yes              |
| 172.18.8.205_9010_1661842550805 | 172.18.8.205 | hadoop01 | 9010        | 8130     | 0         | 0       | FOLLOWER | false    | 1240020905 | true | false | 0                 | NULL                | true     | got exception | NULL              | No               |
+---------------------------------+--------------+----------+-------------+----------+-----------+---------+----------+----------+------------+------+-------+-------------------+---------------------+----------+---------------+-------------------+------------------+
3 rows in set (0.05 sec)

MySQL [(none)]>
2.4 安装BE
将doris压缩文件解压出来的目录be,拷贝到执行的doris安装目录
/opt/app/doris/be修改be的配置文件be.conf
# under the License.

PPROF_TMPDIR="/data/doris/be/log/"

# INFO, WARNING, ERROR, FATAL
sys_log_level = INFO

# ports for admin, web, heartbeat service
be_port = 9060
webserver_port = 8140
heartbeat_service_port = 9050
brpc_port = 8060

# Choose one if there are more than one ip except loopback address.
# Note that there should at most one ip match this list.
# If no ip match this rule, will choose one randomly.
# use CIDR format, e.g. 10.10.10.0/24
# Default value is empty.
# priority_networks = 10.10.10.0/24;192.168.0.0/16
priority_networks = 172.18.8.207/24

# data root path, separate by ';'
# you can specify the storage medium of each root path, HDD or SSD
# you can add capacity limit at the end of each root path, seperate by ','
# eg:
# storage_root_path = /home/disk1/doris.HDD,50;/home/disk2/doris.SSD,1;/home/disk2/doris
# /home/disk1/doris.HDD, capacity limit is 50GB, HDD;
# /home/disk2/doris.SSD, capacity limit is 1GB, SSD;
# /home/disk2/doris, capacity limit is disk capacity, HDD(default)
#
# you also can specify the properties by setting '<property>:<value>', seperate by ','
# property 'medium' has a higher priority than the extension of path
#
# Default value is ${DORIS_HOME}/storage, you should create it by hand.
# storage_root_path = ${DORIS_HOME}/storage
storage_root_path = /data/doris/be/doris-data

# Advanced configurations
# sys_log_dir = ${DORIS_HOME}/log
# sys_log_roll_mode = SIZE-MB-1024
# sys_log_roll_num = 10
# sys_log_verbose_modules = *
# log_buffer_level = -1
# palo_cgroups

# add  by fangct
max_tablet_version_num = 5000
max_compaction_threads = 16
compaction_task_num_per_disk = 8
cumulative_size_based_promotion_size_mbytes = 2048
row_step_for_compaction_merge_log = 1
total_permits_for_compaction_score = 50000
注意:因为安装目录在/opt/doris下,数据和日志目录在/data/doris下;其中webserver_port因为端口冲突,从原来8040改为8140
常见be/fe端口解释:
| 实例名称 | 端口名称 | 默认端口 | 通讯方向 | 说明 |
| BE | be_port | 9060 | FE --> BE | BE 上 thrift server 的端口,用于接收来自 FE 的请求 |
| BE | be_rpc_port | 9070 | BE <--> BE | BE 之间 rpc 使用的端口 |
| BE | webserver_port | 8040 | BE <--> BE | BE 上的 http server 的端口 |
| BE | heartbeat_service_port | 9050 | FE --> BE | BE 上心跳服务端口(thrift),用于接收来自 FE 的心跳 |
| BE | brpc_port* | 8060 | FE<-->BE, BE <--> BE | BE 上的 brpc 端口,用于 BE 之间通讯 |
| FE | http_port * | 8030 | FE <--> FE,用户 | FE 上的 http server 端口 |
| FE | rpc_port | 9020 | BE --> FE, FE <--> FE | FE 上的 thrift server 端口 |
| FE | query_port | 9030 | 用户 | FE 上的 mysql server 端口 |
| FE | edit_log_port | 9010 | FE <--> FE | FE 上的 bdbje 之间通信用的端口 |
| Broker | broker_ipc_port | 8000 | FE --> Broker, BE --> Broker | Broker 上的 thrift server,用于接收请求 |
启动doris的be服务
#启动be服务
cd /opt/app/doris/be/bin
sh start_be.sh --daemon
启动完了be服务,可以查看日志是否有报错,日志在/date/doris/be/log/下
启动完了之后,执行加入be服务到fe的服务监听中
MySQL [(none)]> ALTER SYSTEM ADD BACKEND "172.18.8.205:9050";
Query OK, 0 rows affected (0.03 sec)

MySQL [(none)]> ALTER SYSTEM ADD BACKEND "172.18.8.207:9050";
Query OK, 0 rows affected (0.00 sec)

MySQL [(none)]> ALTER SYSTEM ADD BACKEND "172.18.8.208:9050";
Query OK, 0 rows affected (0.00 sec)

MySQL [(none)]> ALTER SYSTEM ADD BACKEND "172.18.8.209:9050";
Query OK, 0 rows affected (0.01 sec)

MySQL [(none)]> show proc '/backends'
+-----------+-----------------+--------------+----------+---------------+--------+----------+----------+---------------------+---------------------+-------+----------------------+-----------------------+-----------+------------------+---------------+---------------+---------+----------------+--------------------------+--------+-------------------+--------------------------------------------------------------------------------+
| BackendId | Cluster         | IP           | HostName | HeartbeatPort | BePort | HttpPort | BrpcPort | LastStartTime       | LastHeartbeat       | Alive | SystemDecommissioned | ClusterDecommissioned | TabletNum | DataUsedCapacity | AvailCapacity | TotalCapacity | UsedPct | MaxDiskUsedPct | Tag                      | ErrMsg | Version           | Status                                                                         |
+-----------+-----------------+--------------+----------+---------------+--------+----------+----------+---------------------+---------------------+-------+----------------------+-----------------------+-----------+------------------+---------------+---------------+---------+----------------+--------------------------+--------+-------------------+--------------------------------------------------------------------------------+
| 10002     | default_cluster | 172.18.8.205 | hadoop01 | 9050          | 9060   | 8140     | 8060     | 2022-08-30 17:34:04 | 2022-08-30 17:49:56 | true  | false                | false                 | 33        | 2.713 KB         | 4.018 TB      | 5.269 TB      | 23.73 % | 23.73 %        | {"location" : "default"} |        | 0.15.5-d987afe9d0 | {"lastSuccessReportTabletsTime":"2022-08-30 17:48:57","lastStreamLoadTime":-1} |
| 10003     | default_cluster | 172.18.8.207 | hadoop02 | 9050          | 9060   | 8140     | 8060     | 2022-08-30 17:34:11 | 2022-08-30 17:49:56 | true  | false                | false                 | 33        | 0.000            | 3.632 TB      | 4.881 TB      | 25.58 % | 25.58 %        | {"location" : "default"} |        | 0.15.5-d987afe9d0 | {"lastSuccessReportTabletsTime":"2022-08-30 17:49:05","lastStreamLoadTime":-1} |
| 10004     | default_cluster | 172.18.8.208 | hadoop03 | 9050          | 9060   | 8140     | 8060     | 2022-08-30 17:34:16 | 2022-08-30 17:49:56 | true  | false                | false                 | 28        | 0.000            | 2.331 TB      | 3.562 TB      | 34.57 % | 34.57 %        | {"location" : "default"} |        | 0.15.5-d987afe9d0 | {"lastSuccessReportTabletsTime":"2022-08-30 17:49:00","lastStreamLoadTime":-1} |
| 10005     | default_cluster | 172.18.8.209 | hadoop04 | 9050          | 9060   | 8140     | 8060     | 2022-08-30 17:28:24 | 2022-08-30 17:49:56 | true  | false                | false                 | 6         | 0.000            | 429.796 GB    | 1.660 TB      | 74.71 % | 74.71 %        | {"location" : "default"} |        | 0.15.5-d987afe9d0 | {"lastSuccessReportTabletsTime":"2022-08-30 17:49:08","lastStreamLoadTime":-1} |
+-----------+-----------------+--------------+----------+---------------+--------+----------+----------+---------------------+---------------------+-------+----------------------+-----------------------+-----------+------------------+---------------+---------------+---------+----------------+--------------------------+--------+-------------------+--------------------------------------------------------------------------------+
4 rows in set (0.01 sec)
2.5 安装broker
(1)拷贝doris1.1.1对应压缩文件夹下的apache_hdfs_broker目录,将其移动到对应的安装目录/opt/app/doris下面
[root@hadoop02 doris]# pwd
/opt/app/doris
[root@hadoop02 doris]# ll
total 0
drwxr-xr-x.  6 root root  51 Sep  6 17:24 apache_hdfs_broker
drwxr-xr-x.  8 root root  77 Sep  6 09:11 be
drwxr-xr-x. 11 root root 134 Sep  6 14:20 fe
(2)在其他的安装了be和fe节点上重复以上步骤,可以修改apache_hdfs_broker/conf/目录下的文件apache_hdfs_broker.conf(此处保持默认即可)
(3) 启动broker服务
启动完了可以查看broker日志文件中,出现sucessed字样即表示启动成功。
/opt/app/doris/apache_hdfs_broker/bin/start_broker.sh --daemon(4)将broker在doris sql命令行界面执行如下命令
将各个broker服务加入fe服务的监听中
ALTER SYSTEM ADD BROKER broker_name "hadoop01:8000","hadoop02:8000","hadoop03:8000","hadoop04:8000";执行之后查看执行效果查看
MySQL [(none)]> show proc '/brokers'
    -> ;
+-------------+--------------+----------+------+-------+---------------------+---------------------+--------+
| Name        | IP           | HostName | Port | Alive | LastStartTime       | LastUpdateTime      | ErrMsg |
+-------------+--------------+----------+------+-------+---------------------+---------------------+--------+
| broker_name | 172.18.8.209 | hadoop04 | 8000 | true  | 2022-09-06 17:37:24 | 2022-09-07 11:36:04 |        |
| broker_name | 172.18.8.208 | hadoop03 | 8000 | true  | 2022-09-06 17:37:24 | 2022-09-07 11:36:04 |        |
| broker_name | 172.18.8.207 | hadoop02 | 8000 | true  | 2022-09-06 17:37:24 | 2022-09-07 11:36:04 |        |
| broker_name | 172.18.8.205 | hadoop01 | 8000 | true  | 2022-09-06 17:37:24 | 2022-09-07 11:36:04 |        |
+-------------+--------------+----------+------+-------+---------------------+---------------------+--------+
4 rows in set (0.21 sec)
三、doris服务总结
访问doris服务方式
(1)web ui的访问界面
服务访问界面:http://172.18.8.207:8130/
(2)数据库访问工具
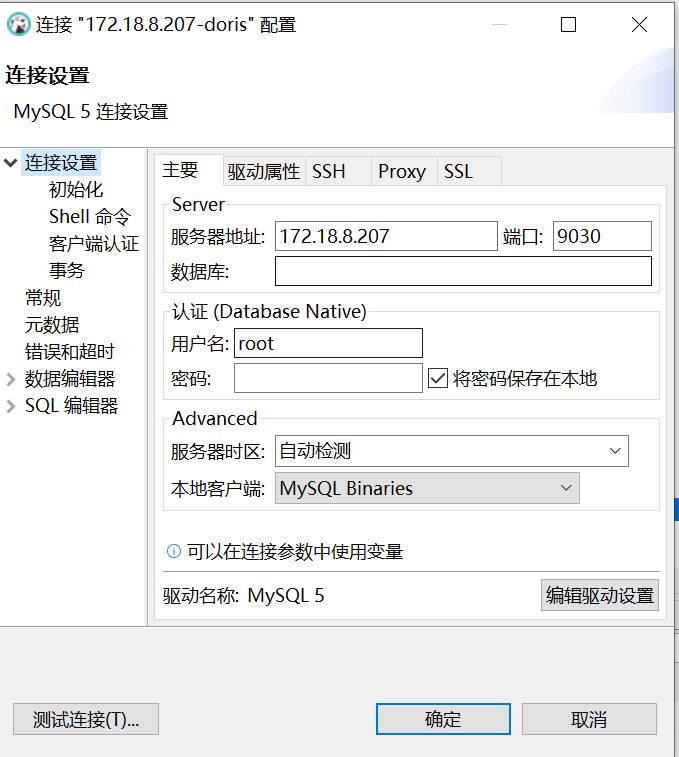
(3).通过mysql-jdbc的方式访问doris
可以使用通过程序,使用jdbc的方式访问doris;使用方式与mysql完全相同;对应的驱动mysql-jdbc的驱动版本,例如选择5.1.xx的版本即可;
使用指南
基础使用指南
[说明] Doris使用培训
常见问题汇总
Doris BE启动出错
其他待处理的问题
-
fe,链接的可用性