使用opencv截取旋转框目标
使用opencv截取旋转框目标
- 1、第一种方法
- 2、第二种方法
- 3、两种方法的简单对比
- 4、opencv 最小面积矩形返回角度的理解
- 4.1、version4.2之前
- 4.1、version4.2之后
本文列举了两种方法,使用的数据如图,用的是改版rolabelimg标注的
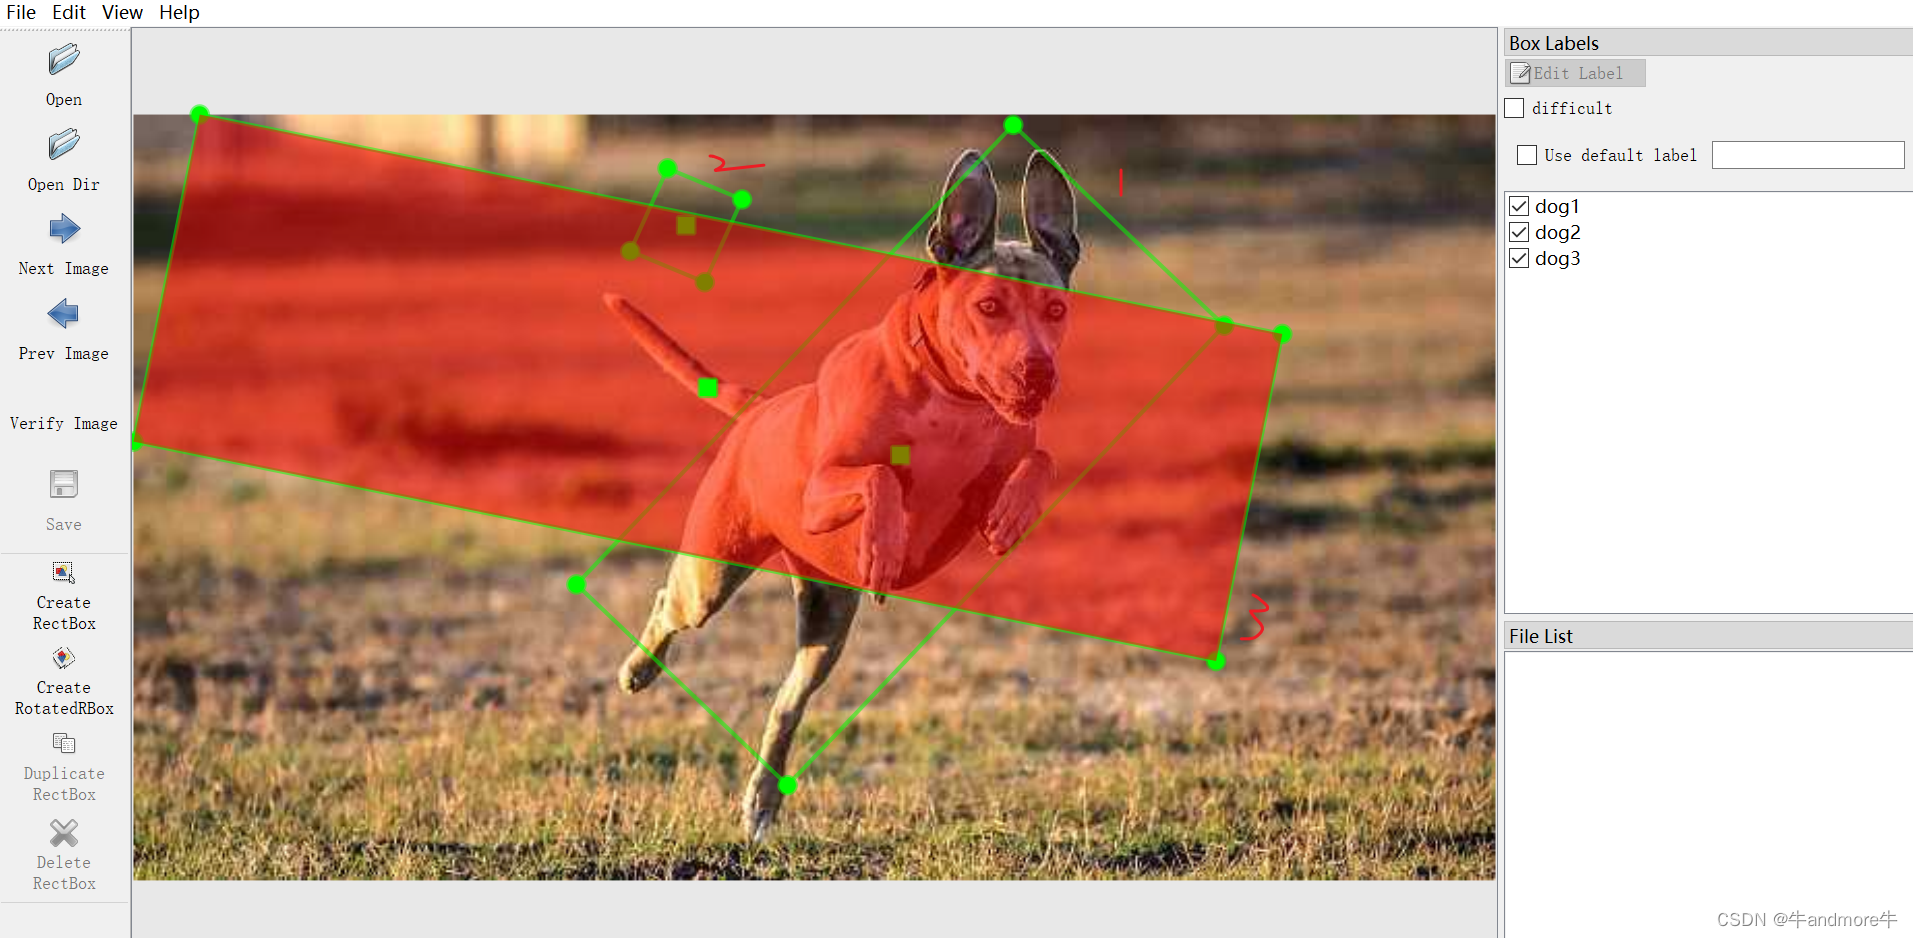
标注文件有四个点的坐标:

1、第一种方法
总体思路是,找最小面积矩形,接着旋转,最后crop
import cv2
import numpy as np
import matplotlib.pyplot as plt


def crop_rect(img, rect):
    # get the parameter of the small rectangle
    center, size, angle = rect[0], rect[1], rect[2]
    center, size = tuple(map(int, center)), tuple(map(int, size))

    # get row and col num in img
    height, width = img.shape[0], img.shape[1]

    # calculate the rotation matrix
    M = cv2.getRotationMatrix2D(center, angle, 1)
    # rotate the original image
    img_rot = cv2.warpAffine(img, M, (width, height))

    # now rotated rectangle becomes vertical, and we crop it
    img_crop = cv2.getRectSubPix(img_rot, size, center)

    return img_crop, img_rot

cnts = []
labels=[]
with open('rodog.txt') as f:
    lines = f.read().strip().splitlines()
for line in lines:
    data = line.split()
    cnt=list(map(int,data[:8]))
    label=data[8]
    cnts.append(cnt)
    labels.append(label)

num=len(cnts)
plt.figure(figsize=(15,num*5))
for i,cnt in enumerate(cnts):
    img = cv2.imread("rodog.jpeg")
    cnt = np.reshape(cnt,[4,2])
    # print("cnt:",cnt)
    # find the exact rectangle enclosing the text area
    # rect is a tuple consisting of 3 elements: the first element is the center
    # of the rectangle, the second element is the width, height, and the
    # third element is the detected rotation angle.
    # Example output: ((227.5, 187.50003051757812),
    # (94.57575225830078, 417.98736572265625), -36.982906341552734)
    rect = cv2.minAreaRect(cnt)
    print("rect: {}".format(rect))

    # the order of the box points: bottom left, top left, top right,
    box = cv2.boxPoints(rect)
    box = np.int0(box)
    print("box:",box)

    # print("bounding box: {}".format(box))
    cv2.drawContours(img, [box], 0, (255, 0, 0), 2)
    # img_crop will the cropped rectangle, img_rot is the rotated image
    img_crop, img_rot = crop_rect(img, rect)
    plt.subplot(num,3,1+i*3)
    plt.imshow(img)
    plt.title('orig')
    plt.subplot(num,3,2+i*3)
    plt.imshow(img_rot)
    plt.title('rotate')
    plt.subplot(num,3,3+i*3)
    plt.imshow(img_crop)
    plt.title('crop')
    # cv2.imwrite(f"orig_img_{i}.jpg", img)
    # cv2.imwrite(f"rotate_img_{i}.jpg", img_rot)
    # cv2.imwrite(f"cropped_img_{i}.jpg", img_crop)

    # cv2.waitKey(0)
rect: ((370.5, 164.50001525878906), (140.75865173339844, 306.3152160644531), 43.54475784301758)
box: [[213 227]
 [425   5]
 [527 101]
 [316 324]]
rect: ((266.9999694824219, 53.499996185302734), (38.984642028808594, 44.95772933959961), 24.22774314880371)
box: [[239  65]
 [258  25]
 [293  41]
 [275  81]]
rect: ((277.5, 132.0), (533.65625, 161.2079315185547), 11.457330703735352)
box: [[  0 157]
 [ 32   0]
 [555 106]
 [523 264]]
显示是用的bgr图,没转rgb
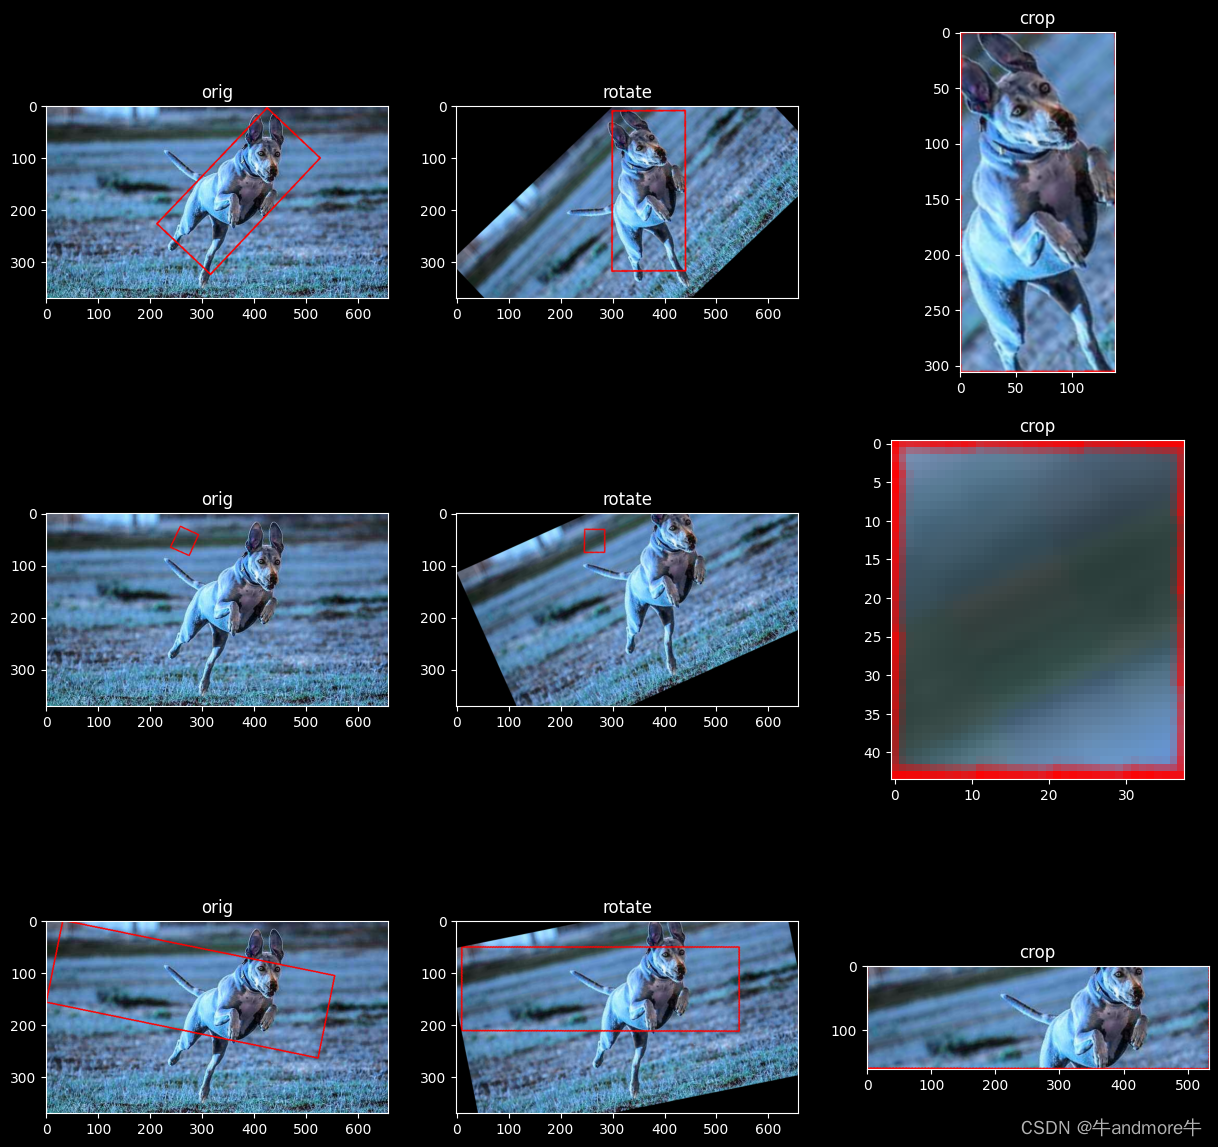
这种方法目前还没有遇到问题,如果遇到问题,可能需要在原图上做pad,相应的标签文件也做好修改再进行处理
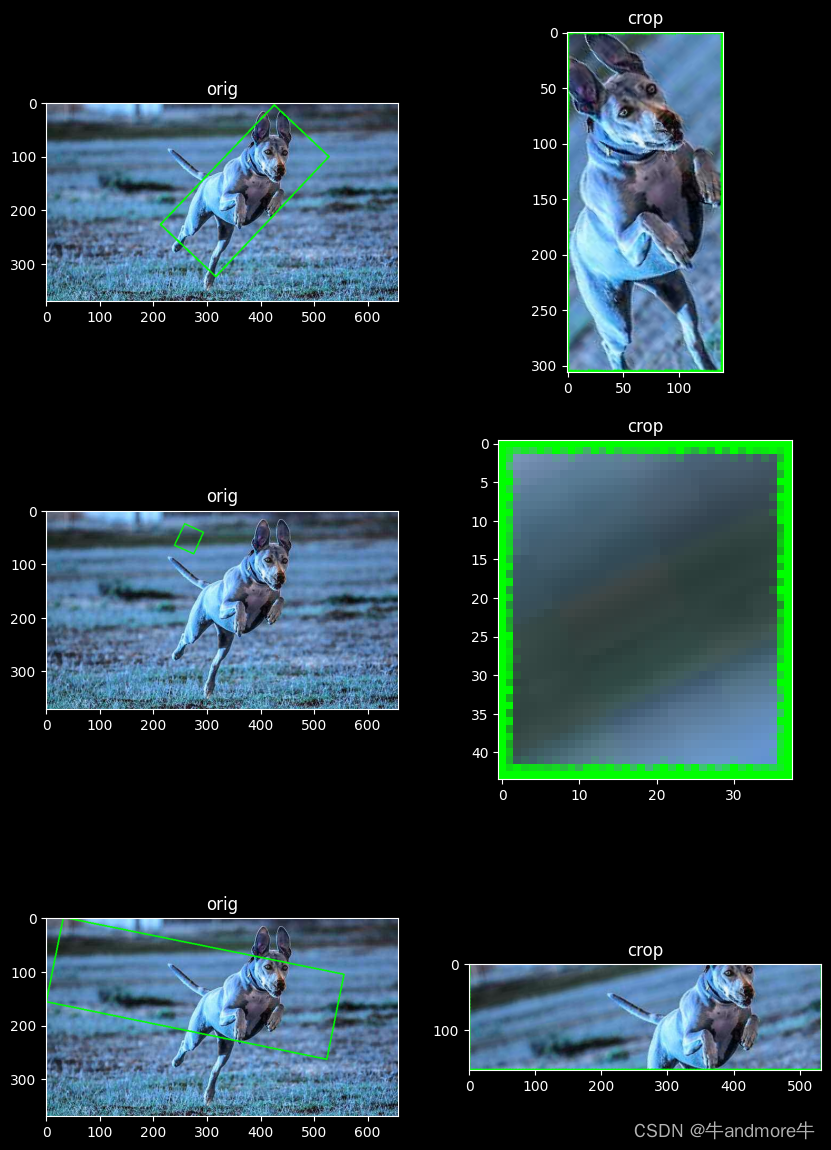
2、第二种方法
思路是先找最小矩形,接着透视变换得到目标图。
import cv2
import numpy as np
import matplotlib.pyplot as plt


cnts = []
labels=[]
with open('rodog.txt') as f:
    lines = f.read().strip().splitlines()
for line in lines:
    data = line.split()
    cnt=list(map(int,data[:8]))
    label=data[8]
    cnts.append(cnt)
    labels.append(label)


num=len(cnts)
plt.figure(figsize=(10,num*5))
for i,cnt in enumerate(cnts):
    img = cv2.imread("rodog.jpeg")
    cnt = np.reshape(cnt,[4,2])
    # print("cnt:",cnt)
    # find the exact rectangle enclosing the text area
    # rect is a tuple consisting of 3 elements: the first element is the center
    # of the rectangle, the second element is the width, height, and the
    # third element is the detected rotation angle.
    # Example output: ((227.5, 187.50003051757812),
    # (94.57575225830078, 417.98736572265625), -36.982906341552734)
    rect = cv2.minAreaRect(cnt)
    # print("rect: {}".format(rect))


    # the order of the box points: bottom left, top left, top right,
    # bottom right
    box = cv2.boxPoints(rect)
    box = np.int0(box)
    # print('box:',box)

    # print("bounding box: {}".format(box))
    cv2.drawContours(img, [box], 0, (0, 255, 0), 2)

    # get width and height of the detected rectangle
    width = int(rect[1][0])
    height = int(rect[1][1])
    # print("width,height:",width,height)
    src_pts = box.astype("float32")
    # coordinate of the points in box points after the rectangle has been
    # straightened
    dst_pts = np.array([[0, height-1],
                        [0, 0],
                        [width-1, 0],
                        [width-1, height-1]
                        ], dtype="float32")

    # the perspective transformation matrix
    M = cv2.getPerspectiveTransform(src_pts, dst_pts)

    # directly warp the rotated rectangle to get the straightened rectangle
    warped = cv2.warpPerspective(img, M, (width, height))

    # cv2.imwrite("crop_img.jpg", warped)
    # cv2.waitKey(0)
    plt.subplot(num,2,1+i*2)
    plt.imshow(img)
    plt.title('orig')
    plt.subplot(num,2,2+i*2)
    plt.imshow(warped)
    plt.title('crop')
3、两种方法的简单对比
img_crop.shape
(161, 533, 3)
warped.shape
(161, 533, 3)
两种方式看效果是一样的,图像尺寸也一样,但要对比像素值,还是不一样,如下代码,绝对误差大于20有4.56%
try:
    np.testing.assert_allclose(img_crop,warped,atol=20)
except Exception as e:
    print(e)
Not equal to tolerance rtol=1e-07, atol=20

Mismatched elements: 11739 / 257439 (4.56%)
Max absolute difference: 255
Max relative difference: 255.
 x: array([[[255,   0,   0],
        [255,   0,   0],
        [237,  15,  18],...
 y: array([[[  0, 255,   0],
        [  0, 255,   0],
        [  0, 255,   0],...
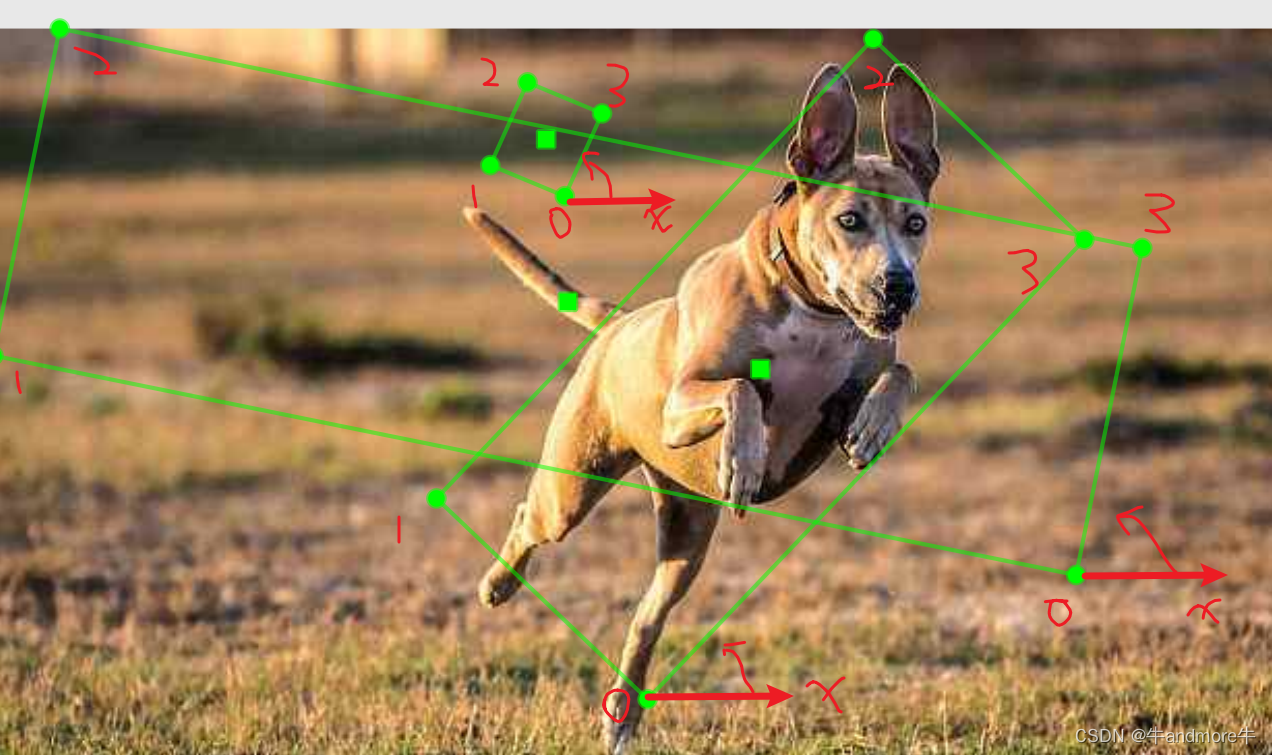
4、opencv 最小面积矩形返回角度的理解
center, size, angle=cv2.minAreaRect(points)
points就是一系的(x,y)的点,center,size,angle分别是最小矩形的中心点,宽高,及angle。对于opencv的这个角度的理解,这里简单写一些,实际是与opencv版本有关,以opencv4.2为分界
4.1、version4.2之前
https://blog.csdn.net/weixin_43229348/article/details/125986969 (https://theailearner.com/tag/cv2-minarearect/) 参考这个博客就好,一句话说,就是x轴逆时针转,接触到的第一条边就是宽边w(不在意长短),转的过程就是角度从0到-90 ,不包括0。
那么最小面积矩形的四个点及顺序是啥,用以下代码获取:
rect = CV2.minAreaRect(cnt)
box = cv2.boxPoints(rect)
box就是四个点的坐标,我们会用这四个点做旋转或透视变换都是需要的。那么顺序是什么呢?
可以理解为x轴与w边相交,箭头反方向的点为起点,接着顺时针。
4.1、version4.2之后
x轴顺时针转,接触到的第一条边就是宽边w(不在意长短),转的过程就是角度从0到90 ,不包括0。x轴也与4.2之前的相反。
点顺序如下:

可以理解为x轴与w边相交,箭头同方向的点为起点,接着顺时针。
本文另一篇参考文章:https://jdhao.github.io/2019/02/23/crop_rotated_rectangle_opencv/#fn:2