WebRTC GCC 拥塞控制算法(TFB-GCC)
目录
一. 前言
二. TFB-GCC原理
1. 接收端记录并反馈收包情况
(1)transport-wide sequence nunmber
(2)RTCP RTPFB TW 报文
2. 发送端结合包接收反馈情况进行带宽预估拥塞控制
(1)基于延时梯度的带宽预估
(2)基于丢包率的带宽预估
三. 参考资料
一. 前言
网络传输中链路的带宽是有限的,为避免往链路发送过载的数据量导致网络拥塞,我们需要进行带宽预估,结合预估带宽作出调整避免网络拥塞。
在《WebRTC GCC 拥塞控制算法(REMB-GCC)》中我们总结了 REMB-GCC 拥塞控制算法,并在文末提到 Google 已经推出 TFB-GCC 取代 REMB-GCC。TFB-GCC 的原理也是基于延时梯度和丢包率进行带宽预估并避免网络拥塞,不同之处在于逻辑都在发送端进行计算,接收端只是反馈包的接收状态(是否收到,以及与上一个包的接收时间差)。
本文主要讲解 TFB-GCC 相关的原理和实现,如果你对基于延时梯度和基于丢包预估带宽的原理不清楚,可以先阅读这篇文章。
二. TFB-GCC原理
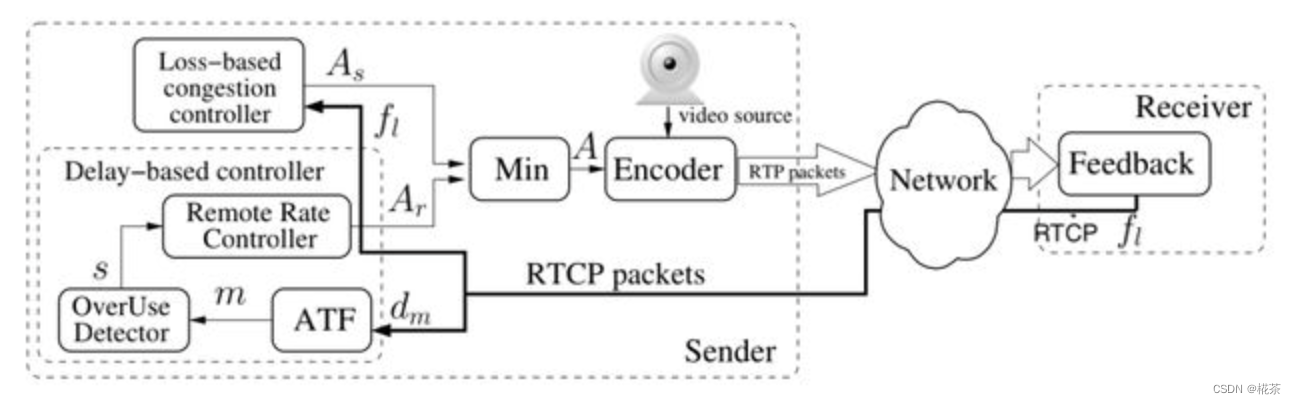
如上是 TFB-GCC 的架构图,左边是发送端部分,右边是接收端部分。
接收端负责记录发送端数据包的到达情况, 并构造 RTCP 报文反馈给发送端,它不进行延时梯度计算的逻辑。
发送端收到 RTCP 反馈报文后,一是根据丢包率预估带宽 As,二是根据延时梯度预估带宽 Ar,最终预估带宽为二者较小值 A=min(As, Ar),以此进行带宽预估拥塞控制。
1. 接收端记录并反馈收包情况
WebRTC 想要使用 TFB-GCC,需要开启 RTP 报文扩展字段(transport-wide sequence number)以及使用 RTCP RTPFB TW 报文反馈(传输带宽反馈报文),关于 RTP,RTCP 协议的详细内容可以参考对应链接的文章。
(1)transport-wide sequence nunmber
RTP 扩展字段 transport-wide sequence number 结构如下,它是一个 one-header 的扩展头部,长度为 2 字节,可以理解为通道序列号。

问题:为什么需要使用 transport-wide sequence number?
一个通道经常会同时传输音频和视频,当我们进行带宽预估时需要预估整个通道的带宽,而不是只结合音频流的收发包情况或者视频流的收发包情况来进行预估。而音频流和视频流发送时 RTP 包初始序号 sequence number 是不同的,并且 sequence number 的增长速度也是不同的,因此我们在发送包时给音频包和视频包打上一个通道序列号,统一计数,这样接收端也方便对通道包接收情况进行应答。
下面是通过 Wireshark 抓取的 RTP 发送包信息,payload-type: 96 是视频流的包,payload-type: 111 是音频流的包,可以看到这四个包的 transport-wide sequence number 是递增的。


备注:如上是使用 ID=3 代表 transport-wide-cc 扩展头,a=extmap:3 http://www.ietf.org/id/draft-holmer-rmcat-transport-wide-cc-extensions-01。
(2)RTCP RTPFB TW 报文
RTCP RTPFB TW 传输带宽反馈报文格式如下(PT=205,FMT=15)。

base sequence number:记录要反馈的第一个 RTP 包的 transport-wide sequence number
packet status count:该反馈报文包含了多少个 RTP 包的到达状态
reference time:接收端反馈报文的第一个包接收的基准时间(24bit),其值单位为 64ms
fb pkt.count:反馈报文发送的数量,相当于 RTCP RTPFB 报文的序号
packet chunk:记录发送端发送的 RTP 包的到达状态,该结构根据第 0 位的值可以表示为 Run length chunk 和 Status vector chunk
Run length chunk 结构

T (chunk type):该位为 0 表示这是一个 Run length chunk
S (packet status symbol):标记包的到达状态
00:Packet not received
01:Packet received, small delta
10:Packet received, large or negative delta
11:Reserved
Run Length:长度,表示有连续多少包为相同到达状态
如下的 Run length chunk 表示连续 221 个包没有收到。
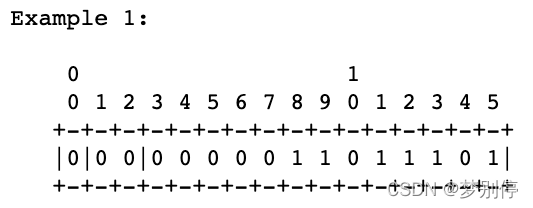
Status vector chunk 结构

T (chunk type):该位为 1 表示这是一个 Status vector chunk
S (symbol size):如果该位为 0 表示只包含 packet not received / packet received 两种状态,这样 14bit 的 symbol list 可以表示 14 个包的状态,如果该位为 1 表示使用 2bit 来表示包的状态,这样 symbol list 可以表示 7 个包的状态
symbol list:标识一系列包的状态
备注:当很多包的接收状态都是一致时,比如都是 Received 且到达间隔为 SmallDelta,则使用 Run length chunk 来表示这些包的接收状态,当包的接收状态不一致时就不能使用 Run length chunk 表示相同的接收状态了,此时则使用 Status vector chunk。

上图所示的 Status vector chunk,S 位为 0 表示 symbol list 中 1bit 代表一个包的接收状态,0 表示未接收,1 代表接收,因此上图表示 1 个包未收到,接下来的 5 个包是收到的,接下来的 3 个包未收到,之后的 3 个包是收到的,最后 2 个包没有收到。

上图所示的 Status vector chunk,S 位为 1 表示 symbol list 中 2bit 代表一个包的接收状态,因此上图表示第一个包是未接收到的,第二个包是接收到的(w/o timestamp),接下来的 3 个包是接收到的,最后的 2 个包是未收到的。
recv delta:前后两个 RTP 包到达时间间隔,单位值代表 250us,如果到达时间间隔 <= 63.75ms 则认为是 SmallDelta,使用 1 字节,如果大于 63.75ms 则认为是 LargeDelta,使用 2 字节。
2. 发送端结合包接收反馈情况进行带宽预估拥塞控制
(1)基于延时梯度的带宽预估
如下图所示,发送端在 T(i-1) 和 T(i) 发送了两个数据包,接收端分别在 t(i-1) 和 t(i) 接收到了这两个数据包,延时梯度 d(t(i)) = [t(i) - t(i-1)] - [T(i) - T(i-1)]。
在理想状态下的网络传输,d(t(i)) 应该为 0,如果网络发生拥塞,T(i) 时刻发出来的包被接收端接收需要更长的时间,此时 d(t(i)) 大于 0,如果 d(t(i)) 大于 0 且越来越大,说明网络拥塞更严重,如果 d(t(i)) 大于 0 但是越来越小,说明网络拥塞状况处于好转状态。

我们以 WebRTC 代码说明发送端是如何根据 RTCP 反馈报文以及丢包率情况预估带宽并进行拥塞控制的处理逻辑,对于 TFB-GCC,基于延时梯度的带宽预估主要包括:Arrival-time filter,TrendlineEstimator。
a. Arrival-time filter
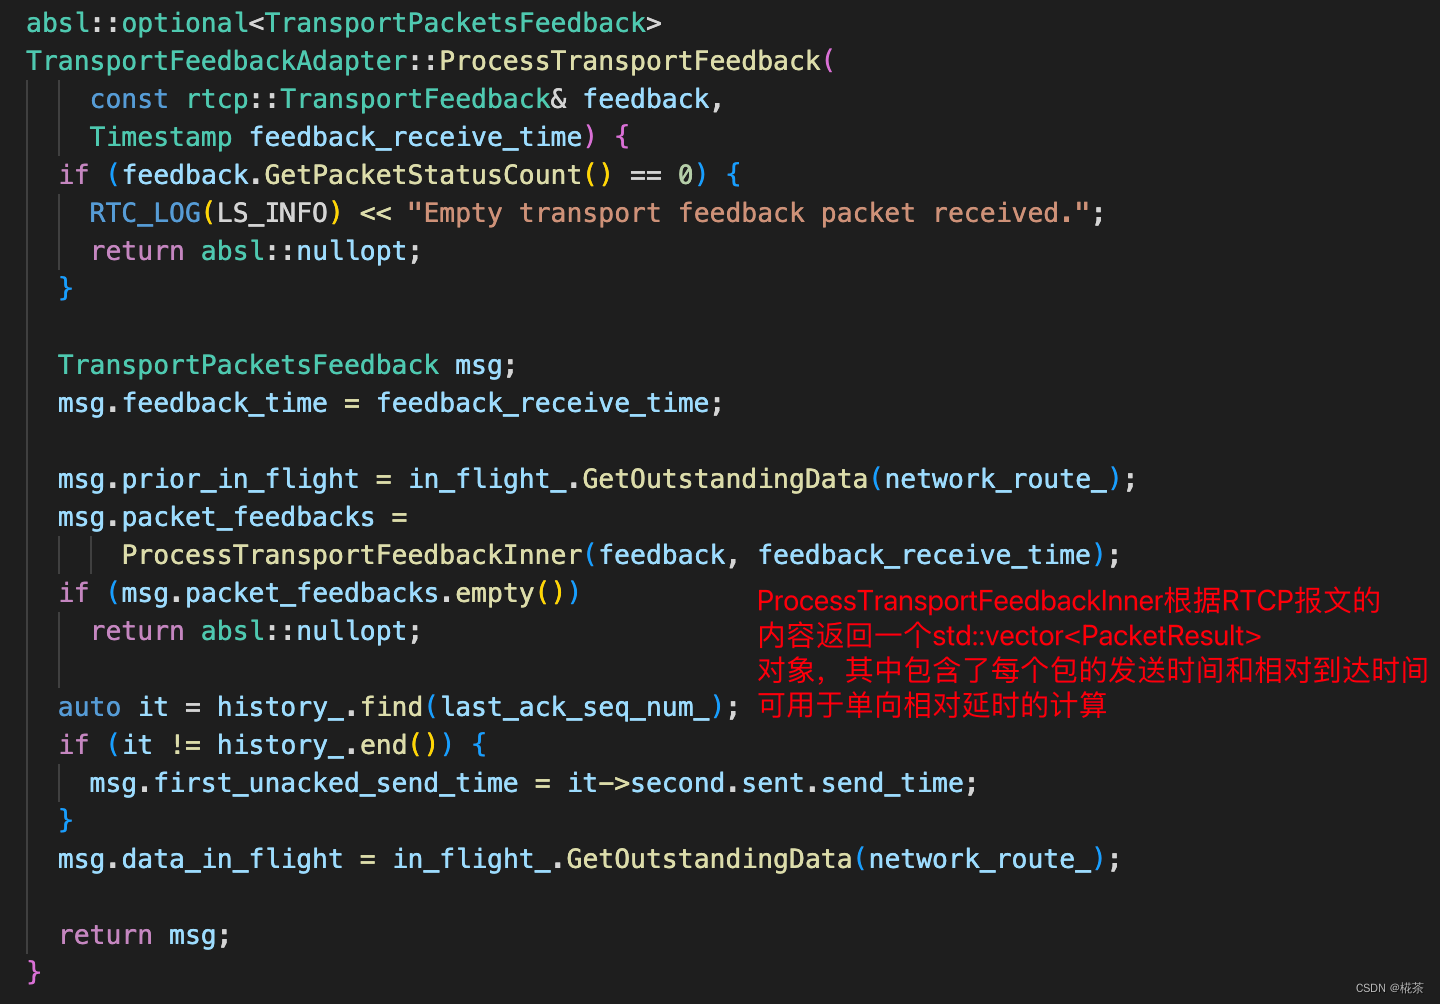
当收到 RTCP RTPFB TW 报文后会调用 RtpTransportControllerSend::OnTransportFeedback 函数,该函数先调用 TransportFeedbackAdapter::ProcessTransportFeedback 获取包的到达状态信息,再调用 GoogCcNetworkController::OnTransportPacketsFeedback 根据包的到达状态信息基于延时梯度进行带宽预估,最后将预估带宽值更新到 Pace,编码等模块,具体逻辑如下。

TransportFeedbackAdapter::ProcessTransportFeedback 主要是调用 ProcessTransportFeedbackInner 根据 RTCP RTPFB TW 报文的内容获取一组包的相对到达时间,用于计算包的延时梯度。
std::vector<PacketResult>
TransportFeedbackAdapter::ProcessTransportFeedbackInner(
const rtcp::TransportFeedback& feedback,
Timestamp feedback_receive_time) {
// Add timestamp deltas to a local time base selected on first packet arrival.
// This won't be the true time base, but makes it easier to manually inspect
// time stamps.
if (last_timestamp_.IsInfinite()) {
current_offset_ = feedback_receive_time;
} else {
// TODO(srte): We shouldn't need to do rounding here.
const TimeDelta delta = feedback.GetBaseDelta(last_timestamp_)
.RoundDownTo(TimeDelta::Millis(1));
// Protect against assigning current_offset_ negative value.
if (delta < Timestamp::Zero() - current_offset_) {
RTC_LOG(LS_WARNING) << "Unexpected feedback timestamp received.";
current_offset_ = feedback_receive_time;
} else {
current_offset_ += delta;
}
}
last_timestamp_ = feedback.GetBaseTime();
std::vector<PacketResult> packet_result_vector;
packet_result_vector.reserve(feedback.GetPacketStatusCount());
size_t failed_lookups = 0;
size_t ignored = 0;
TimeDelta packet_offset = TimeDelta::Zero();
for (const auto& packet : feedback.GetAllPackets()) {
int64_t seq_num = seq_num_unwrapper_.Unwrap(packet.sequence_number());
if (seq_num > last_ack_seq_num_) {
// Starts at history_.begin() if last_ack_seq_num_ < 0, since any valid
// sequence number is >= 0.
for (auto it = history_.upper_bound(last_ack_seq_num_);
it != history_.upper_bound(seq_num); ++it) {
in_flight_.RemoveInFlightPacketBytes(it->second);
}
last_ack_seq_num_ = seq_num;
}
auto it = history_.find(seq_num);
if (it == history_.end()) {
++failed_lookups;
continue;
}
if (it->second.sent.send_time.IsInfinite()) {
// TODO(srte): Fix the tests that makes this happen and make this a
// DCHECK.
RTC_DLOG(LS_ERROR)
<< "Received feedback before packet was indicated as sent";
continue;
}
PacketFeedback packet_feedback = it->second;
if (packet.received()) {
packet_offset += packet.delta();
packet_feedback.receive_time =
current_offset_ + packet_offset.RoundDownTo(TimeDelta::Millis(1));
// Note: Lost packets are not removed from history because they might be
// reported as received by a later feedback.
history_.erase(it);
}
if (packet_feedback.network_route == network_route_) {
PacketResult result;
result.sent_packet = packet_feedback.sent;
result.receive_time = packet_feedback.receive_time;
packet_result_vector.push_back(result);
} else {
++ignored;
}
}
if (failed_lookups > 0) {
RTC_LOG(LS_WARNING) << "Failed to lookup send time for " << failed_lookups
<< " packet" << (failed_lookups > 1 ? "s" : "")
<< ". Send time history too small?";
}
if (ignored > 0) {
RTC_LOG(LS_INFO) << "Ignoring " << ignored
<< " packets because they were sent on a different route.";
}
return packet_result_vector;
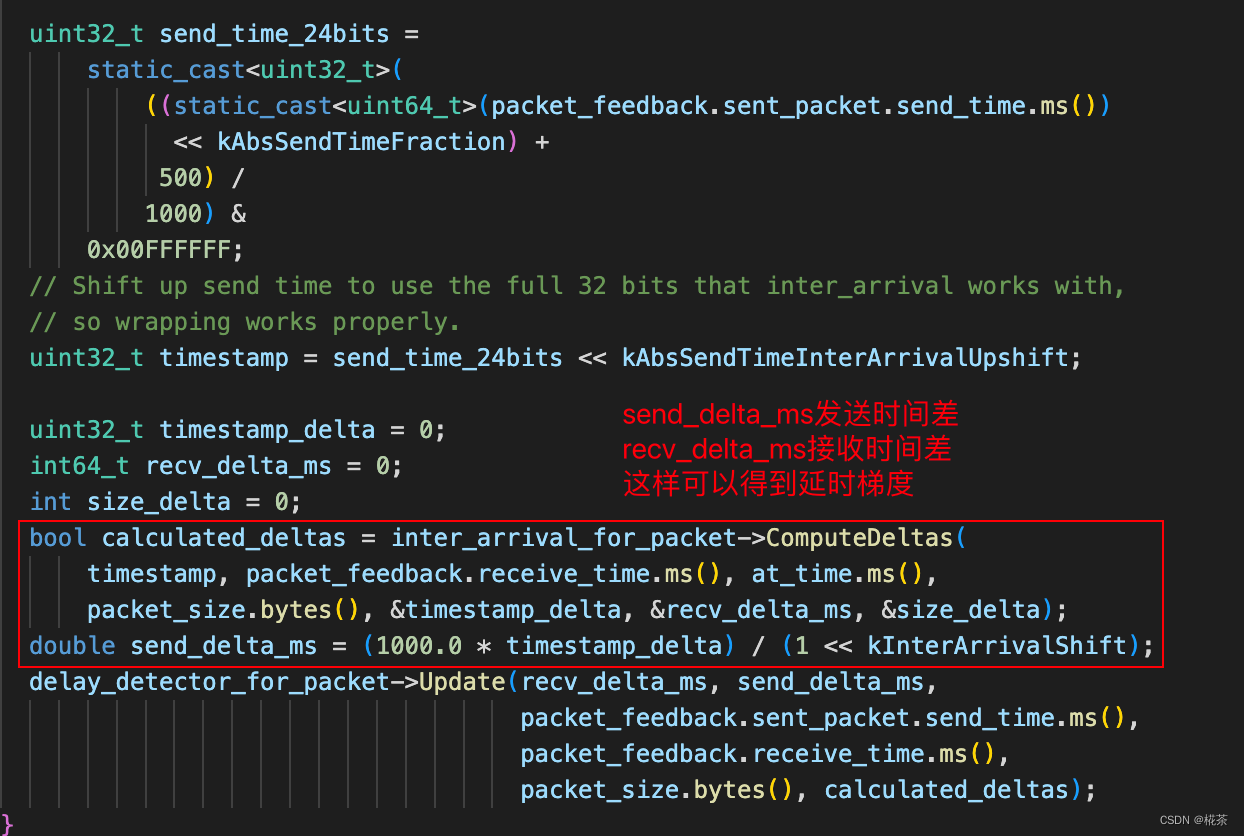
}获取包的相对到达时间后再调用 DelayBasedBwe::IncomingPacketFeedbackVector 分析延时梯度变化,关键调用流程为:DelayBasedBwe::IncomingPacketFeedbackVector -> DelayBasedBwe::IncomingPacketFeedback -> InterArrival::ComputeDeltas。


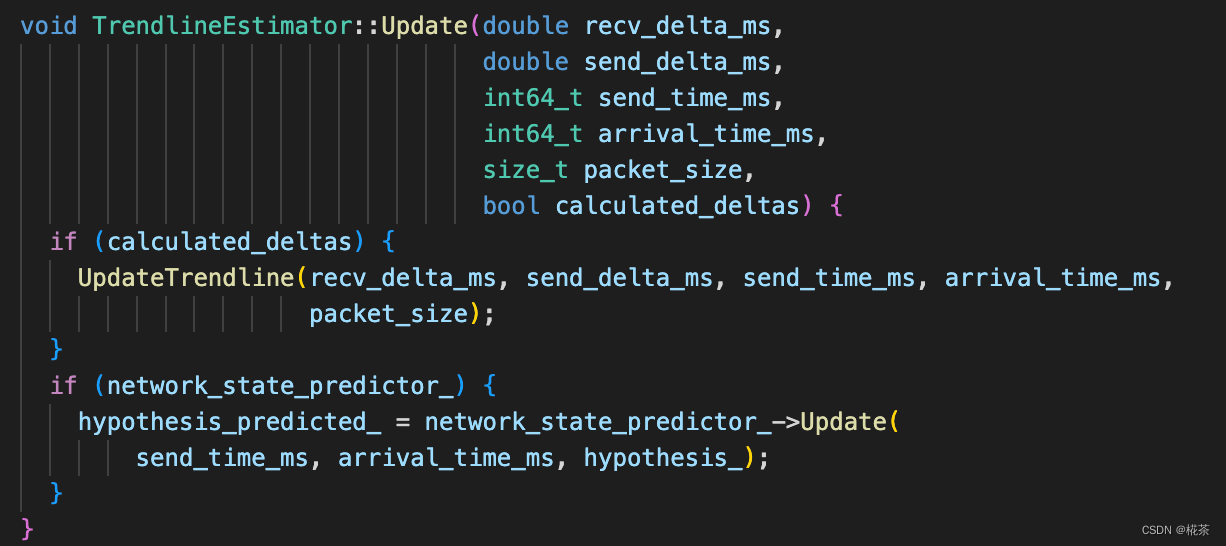
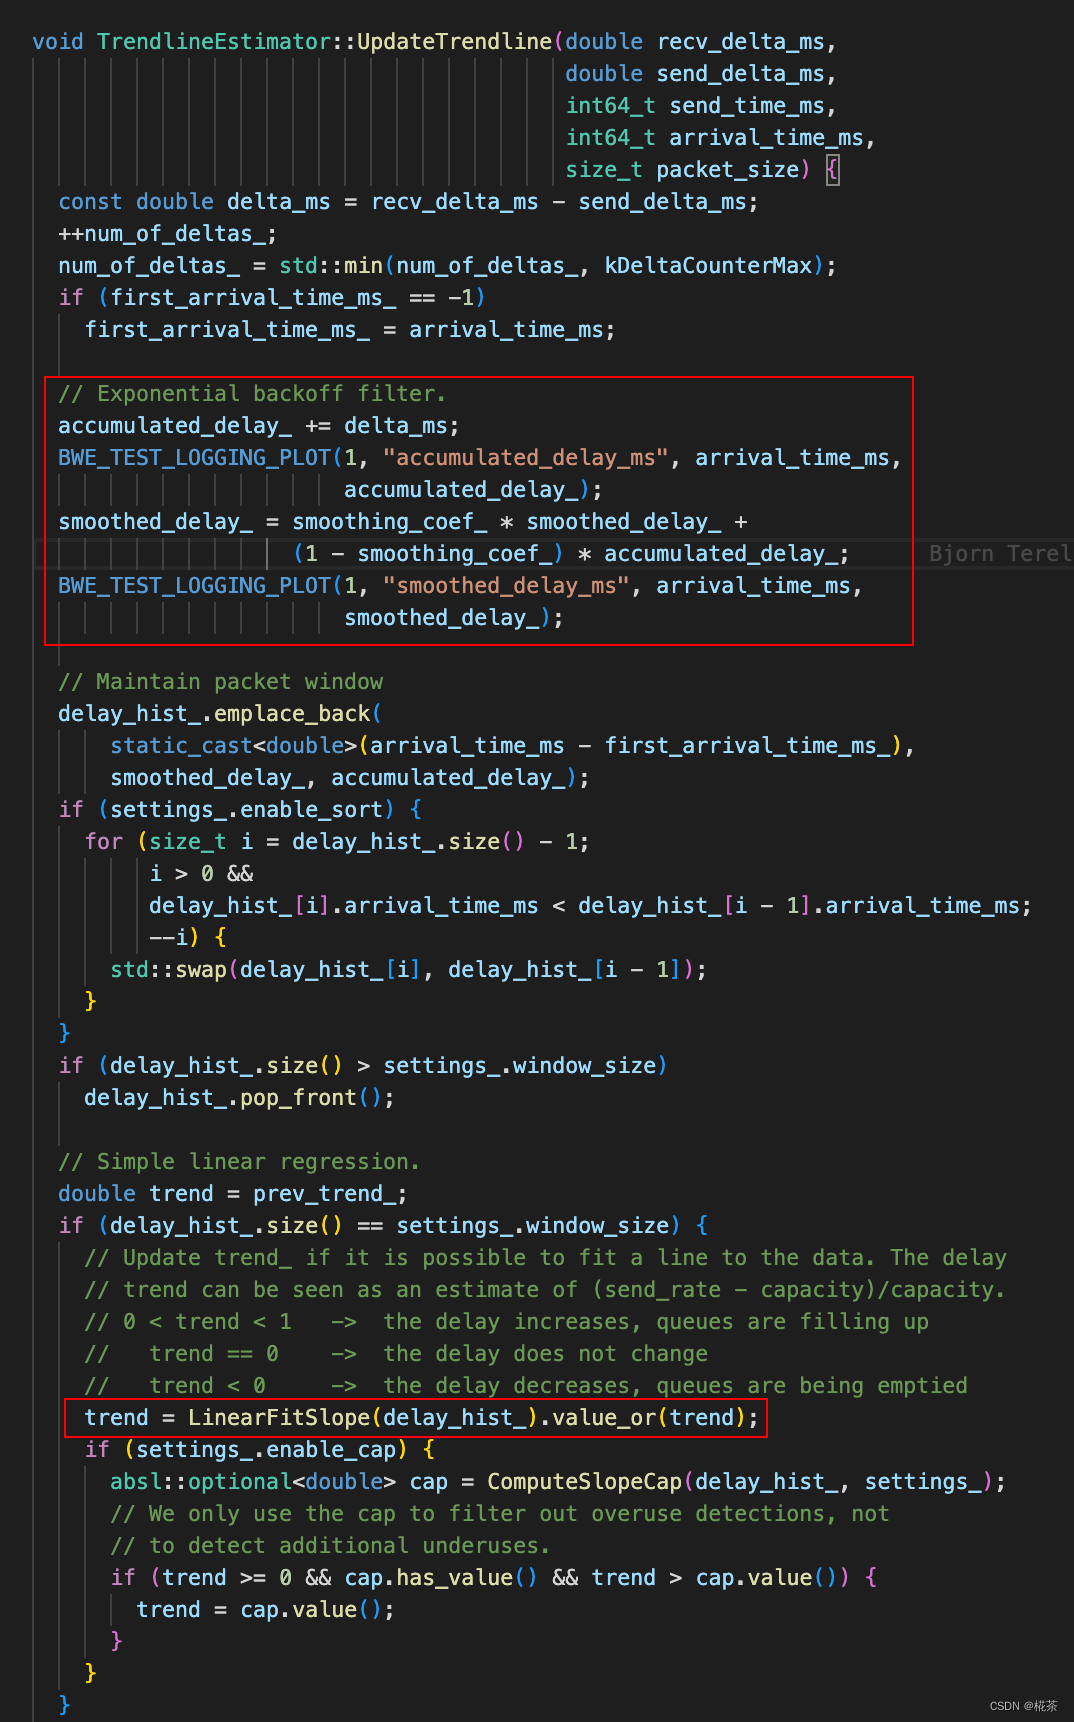
b. Trendline estimator
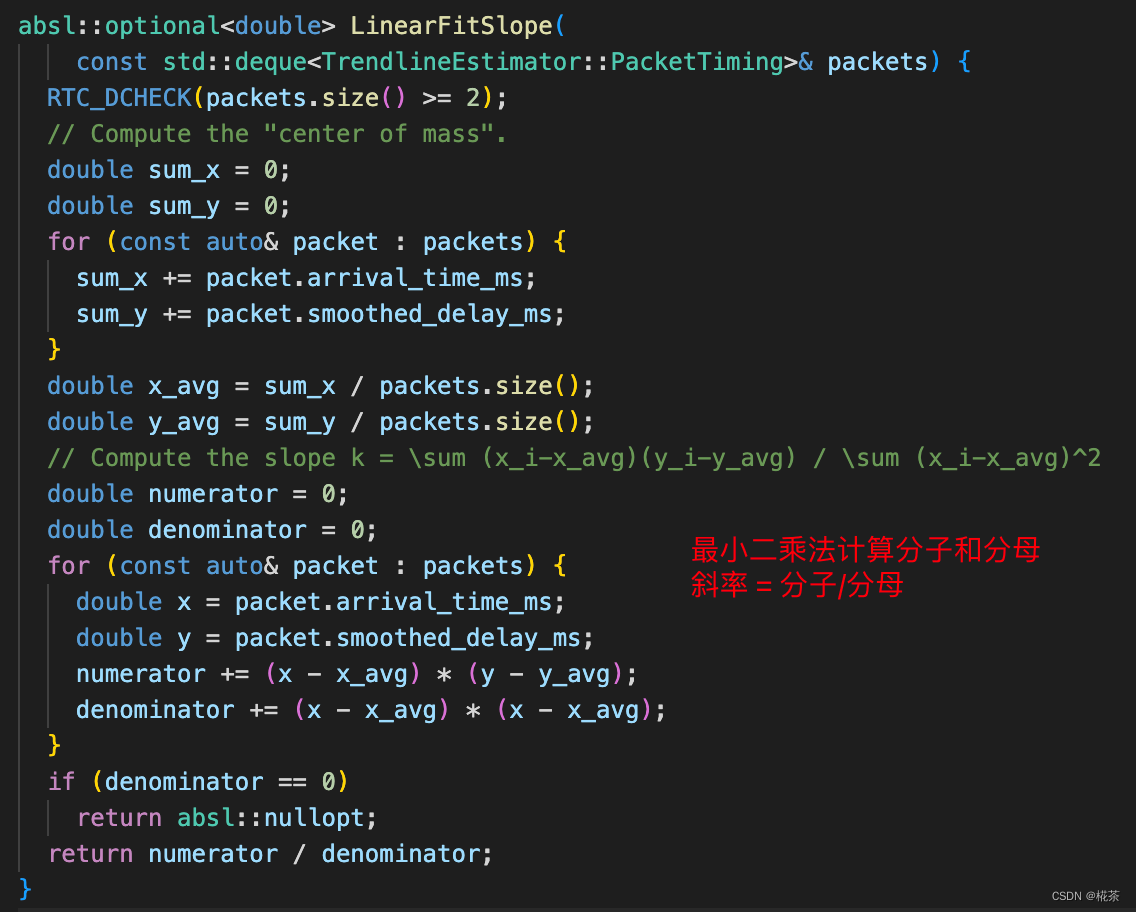
REMB-GCC 中是使用的是卡尔曼滤波计算延时梯度的变化,而在 TFB-GCC 中使用的是线性滤波计算累计延时梯度的变化趋势,即通过最小二乘法拟合一堆样本点 (x, y) 的关系,通过直线斜率判断变化趋势。代入到拟合直线方程中,x 相当于时间,y 相当于平滑后的累计延时梯度。

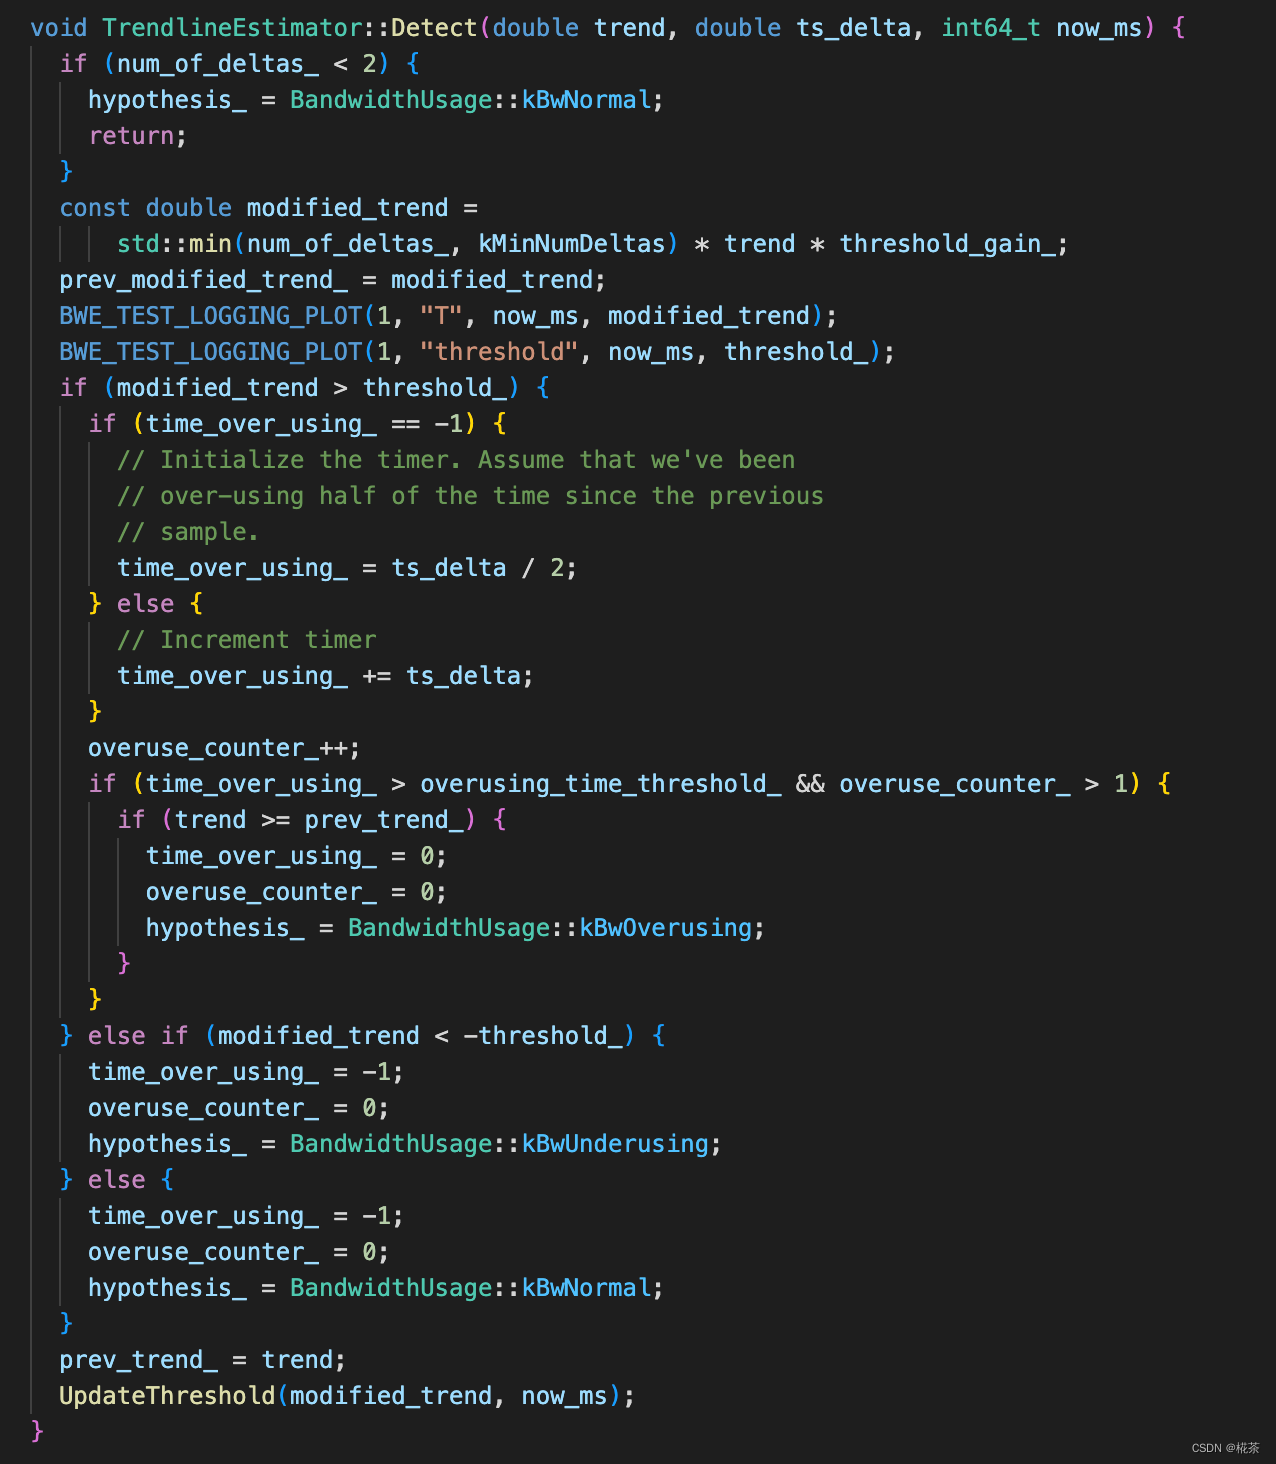
得到线性滤波的斜率后再调用 TrendlineEstimator::Detect 判断当前带宽的使用状态,TrendlineEstimator::Detect 根据累计延时梯度的趋势 trend 与动态阈值的大小关系判断当前带宽处于 overuse/normal/underuse 状态,动态阈值 threshold_ 将在下一小节 Adaptive threshold 中讲解。
a. 如果 trend > threshold_,说明网络网络拥塞队列在增大,目前处于拥塞状态,如果拥塞持续时间大于 overusing_time_threshold_,并且延时梯度比上一次延时梯度大,判断处于 overuse 状态,注意不是一旦大于阈值就判断处于 overuse,需要持续一段时间并且延时梯度在变大才判断处于 overuse
b. 如果 trend < -threshold_,说明网络拥塞队列在变小,拥塞情况在改善,判断处于 underuse 状态
c. 如果 -threshold_ <= trend <= threshold_,判断处于 normal 状态
(3)Adaptive threshold
如上所述,TrendlineEstimator 通过比较累计延时梯度的变化与阈值的大小关系判断当前的带宽使用状况,理想网络情况下延时梯度为 0,但是正常的带宽占用情况下,延时梯度也可能在 0 上下波动,但是累计延时梯度应该趋近于 0,因此累计延时梯度的变化趋近于 0,因此想根据累计延时梯度的变化来判断带宽使用状况,阈值的设置很重要,如果阈值是固定值,设置太大可能检测不到网络拥塞,设置太小可能又太过敏感,WebRTC 使用了一种自适应动态阈值的方式。
计算方式:threshold(t(i)) = threshold(t(i-1)) + k * [ t(i) - t(i-1) ] * [ | trend(t(i)) | - threshold(t(i-1)) ]
其中 k 表示变化率,当 | trend(t(i)) | < threshold(t(i-1)) 时,k 值为 0.039,否则 k 值为 0.0087,
threshold(t(i)) 表示当我们计算第 i 个包后需要新确定的阈值,threshold(t(i-1)) 表示计算第 i-1 个包后确定的阈值,t(i) - t(i-1) 表示两个包计算延时梯度的时间差,trend(t(i)) 表示当前算出的延时梯度的趋势(经过放大后的值)。

(4)Rate controller
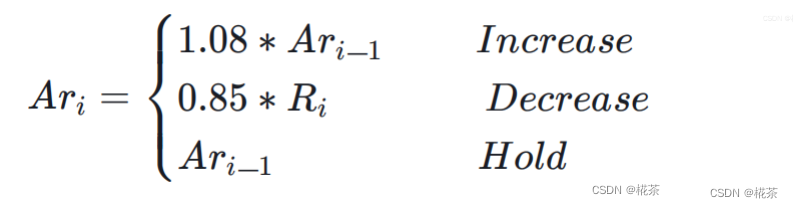
通过判断当前处于带宽的何种使用状态后,需要根据当前状态对最大码率值做出调整,如下图所示。
当处于 overuse 状态,对应处于 Decr 状态,此时应该降低最大码率值,降低为过去 500ms 时间窗内最大 acked_bitrate 的 0.85 倍,acked_bitrate 可以通过 RTCP 反馈报文的包接收情况并结合本地维护的发送列表得到
当处于 underuse 状态,对应 Hold 状态,此时应该维持当前最大码率不变
当处于 normal 状态,对应 Incr,此时可以适当增大码率,增大为原来最大码率值的 1.08 倍

WebRTC 对应的 Rate Controller 调整最大码率的代码如下。

void AimdRateControl::ChangeBitrate(const RateControlInput& input,
                                    Timestamp at_time) {
  absl::optional<DataRate> new_bitrate;
  DataRate estimated_throughput =
      input.estimated_throughput.value_or(latest_estimated_throughput_);
  if (input.estimated_throughput)
    latest_estimated_throughput_ = *input.estimated_throughput;

  // An over-use should always trigger us to reduce the bitrate, even though
  // we have not yet established our first estimate. By acting on the over-use,
  // we will end up with a valid estimate.
  if (!bitrate_is_initialized_ &&
      input.bw_state != BandwidthUsage::kBwOverusing)
    return;

  ChangeState(input, at_time);

  // We limit the new bitrate based on the troughput to avoid unlimited bitrate
  // increases. We allow a bit more lag at very low rates to not too easily get
  // stuck if the encoder produces uneven outputs.
  const DataRate troughput_based_limit =
      1.5 * estimated_throughput + DataRate::KilobitsPerSec(10);

  switch (rate_control_state_) {
    case kRcHold:
      break;

    case kRcIncrease:
      if (estimated_throughput > link_capacity_.UpperBound())
        link_capacity_.Reset();

      // Do not increase the delay based estimate in alr since the estimator
      // will not be able to get transport feedback necessary to detect if
      // the new estimate is correct.
      // If we have previously increased above the limit (for instance due to
      // probing), we don't allow further changes.
      if (current_bitrate_ < troughput_based_limit &&
          !(send_side_ && in_alr_ && no_bitrate_increase_in_alr_)) {
        DataRate increased_bitrate = DataRate::MinusInfinity();
        if (link_capacity_.has_estimate()) {
          // The link_capacity estimate is reset if the measured throughput
          // is too far from the estimate. We can therefore assume that our
          // target rate is reasonably close to link capacity and use additive
          // increase.
          DataRate additive_increase =
              AdditiveRateIncrease(at_time, time_last_bitrate_change_);
          increased_bitrate = current_bitrate_ + additive_increase;
        } else {
          // If we don't have an estimate of the link capacity, use faster ramp
          // up to discover the capacity.
          DataRate multiplicative_increase = MultiplicativeRateIncrease(
              at_time, time_last_bitrate_change_, current_bitrate_);
          increased_bitrate = current_bitrate_ + multiplicative_increase;
        }
        new_bitrate = std::min(increased_bitrate, troughput_based_limit);
      }

      time_last_bitrate_change_ = at_time;
      break;

    case kRcDecrease: {
      DataRate decreased_bitrate = DataRate::PlusInfinity();

      // Set bit rate to something slightly lower than the measured throughput
      // to get rid of any self-induced delay.
      decreased_bitrate = estimated_throughput * beta_;
      if (decreased_bitrate > current_bitrate_ && !link_capacity_fix_) {
        // TODO(terelius): The link_capacity estimate may be based on old
        // throughput measurements. Relying on them may lead to unnecessary
        // BWE drops.
        if (link_capacity_.has_estimate()) {
          decreased_bitrate = beta_ * link_capacity_.estimate();
        }
      }
      if (estimate_bounded_backoff_ && network_estimate_) {
        decreased_bitrate = std::max(
            decreased_bitrate, network_estimate_->link_capacity_lower * beta_);
      }

      // Avoid increasing the rate when over-using.
      if (decreased_bitrate < current_bitrate_) {
        new_bitrate = decreased_bitrate;
      }

      if (bitrate_is_initialized_ && estimated_throughput < current_bitrate_) {
        if (!new_bitrate.has_value()) {
          last_decrease_ = DataRate::Zero();
        } else {
          last_decrease_ = current_bitrate_ - *new_bitrate;
        }
      }
      if (estimated_throughput < link_capacity_.LowerBound()) {
        // The current throughput is far from the estimated link capacity. Clear
        // the estimate to allow an immediate update in OnOveruseDetected.
        link_capacity_.Reset();
      }

      bitrate_is_initialized_ = true;
      link_capacity_.OnOveruseDetected(estimated_throughput);
      // Stay on hold until the pipes are cleared.
      rate_control_state_ = kRcHold;
      time_last_bitrate_change_ = at_time;
      time_last_bitrate_decrease_ = at_time;
      break;
    }
    default:
      assert(false);
  }

  current_bitrate_ = ClampBitrate(new_bitrate.value_or(current_bitrate_));
}
最后将基于延时梯度预估的最大码率值保存到 SendSideBandwidthEstimation 的 delay_based_limit_ 变量中。

(2)基于丢包率的带宽预估
发送端基于丢包的带宽预估思想主要是根据丢包率大小来判断是否拥塞。
当丢包率大于 10% 时认为拥塞,此时应该主动降低发送码率减少拥塞;当丢包率小于 2% 时认为网络状况较好,可以适当提高发送码率,探测是否有更多的可用带宽;当丢包率介于 2% ~ 10% 时认为网络状况一般,此时保持与上一次相同的发送码率即可。
对于丢包率的获取,发送端通过 RTCP RR 报文的丢包数和接收到的最大序号包数来判断丢包率,RR 报文格式和字段含义如下所示。
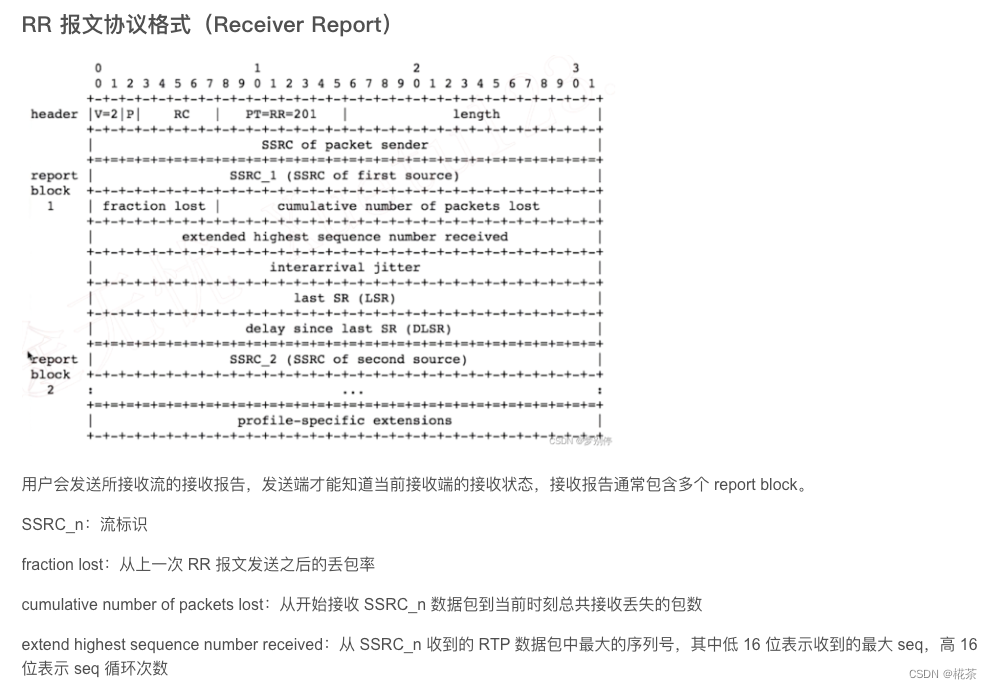
WebRTC 接收 RR 报文并根据丢包率预估带宽的代码如下所示。

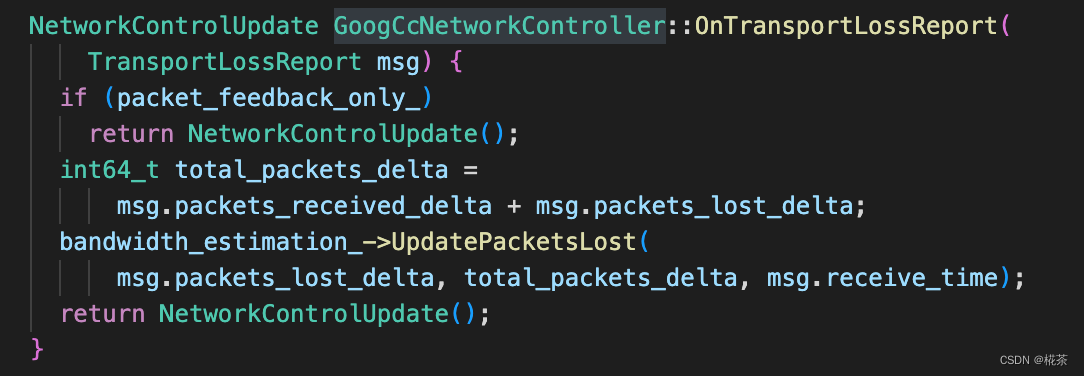


最后 UpdateTargetBitrate 中会取根据丢包得到的预估值和根据延时梯度得到的预估值中的较小值作为最终预估的最大码率。

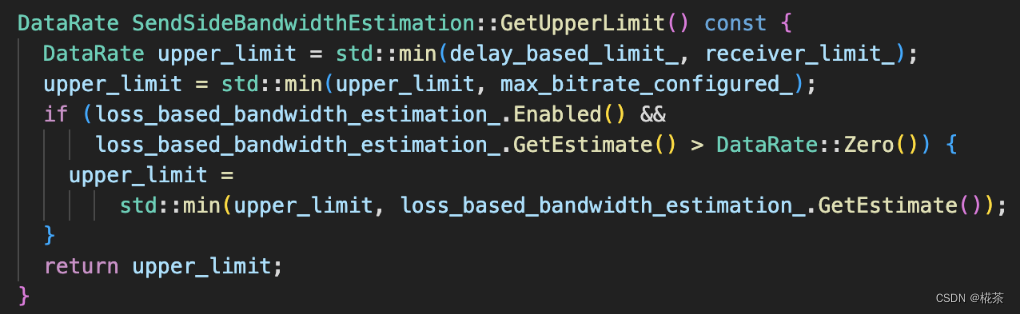
确定完目标码率后会更新到 pacer,fec,编码模块中发挥作用。
三. 参考资料
RFC transport wide cc extensions
小议WebRTC拥塞控制算法:GCC介绍
Analysis and Design of the Google Congestion Control for Web Real-time