小程序项目学习--第六章:项目实战二、推荐歌曲-歌单展示-巅峰榜-歌单详情-页面优化
第六章:推荐歌曲-歌单展示-巅峰榜-歌单详情-页面优化
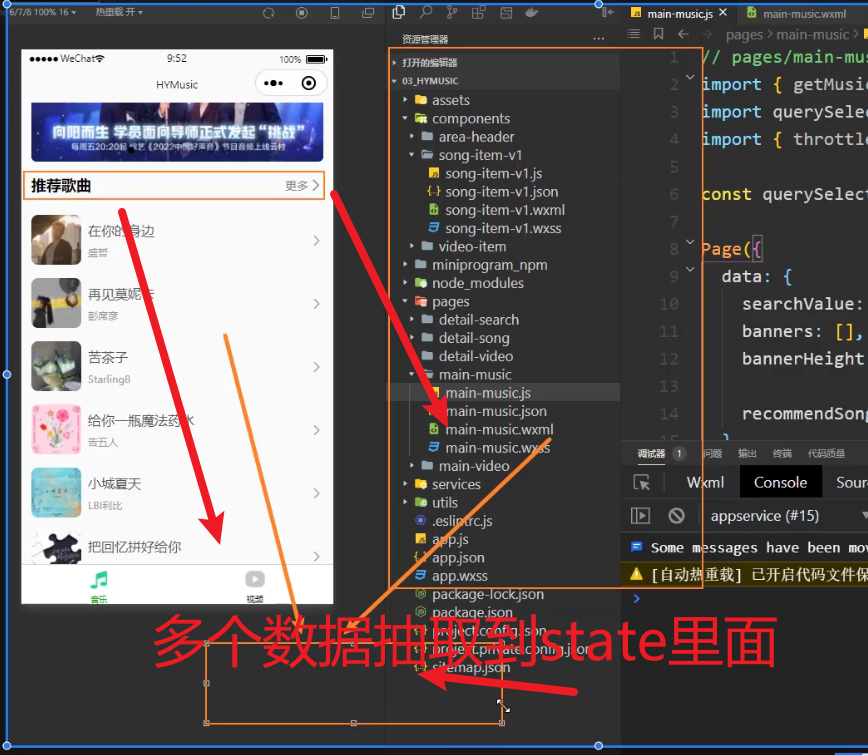
01_(掌握)音乐页面-推荐歌曲的数据获取和展示
推荐歌曲的数据获取的实现步骤
0.封装对应请求接口方法
export function getPlaylistDetail(id) {
  return hyRequest.get({
    url: "/playlist/detail",
    data: {
      id
    }
  })
}
1.封装和调用请求函数的方法
import { getPlaylistDetail } from "../../services/music"

onLoad() {
    this.fetchRecommendSongs()
  }

  // async fetchRecommendSongs() {
  //   const res = await getPlaylistDetail(3778678)
  //   const playlist = res.playlist
  //   const recommendSongs = playlist.tracks.slice  (0, 6)
  //   this.setData({ recommendSongs })
  // },
2.将数据放到data中
data:{
    recommendSongs: [],
}
3.展示数据
<!-- 3.推荐歌曲的展示 -->
<view class="recommend" wx:if="{{recommendSongs.length}}">
  <area-header title="推荐歌曲" bind:moreclick="onRecommendMoreClick"/>
  <view class="list">
    <block wx:for="{{recommendSongs}}" wx:key="id">
      <song-item-v1 itemData="{{item}}"/>
    </block>
  </view>
</view>
针对每个item,我们可以继续封装成一个小组件song-item-v1
封装一个小组件步骤
1.创建组件页面
song-item-v1
2.在使用组件的地方注册组件,使用组件
 "usingComponents": {
	"song-item-v1": "/components/song-item-v1/song-item-v1"
 }
3.通过properties中接受父组件传递过来的数据
// components/song-item-v1/song-item-v1.js
Component({
  properties: {
    itemData: {
      type: Object,
      value: {}
    }
  }
})
4.在界面中展示传递过来的值
<!--components/song-item-v1/song-item-v1.wxml-->
<view class="song-item">
 <image class="image" src="{{itemData.al.picUrl}}"></image>
 <view class="content">
   <view class="name">{{itemData.name}}</view>
   <view class="source">{{itemData.ar[0].name}}</view>
 </view>
 <view class="arrow">
   <van-icon name="arrow" color="#999" size="16px" />
 </view>
</view>
5.然后可以自定义组件需要的任何东西
{
  "component": true,
  "usingComponents": {
    "van-icon": "@vant/weapp/icon/index"
  }
}

/* components/song-item-v1/song-item-v1.wxss */
.song-item {
  display: flex;
  padding: 16rpx 0;
  align-items: center;
}

.image {
  width: 120rpx;
  height: 120rpx;
  border-radius: 16rpx;
}

.content {
  margin-left: 16rpx;
  flex: 1;
}

.content .name {
  font-size: 32rpx;
  color: #555;
}

.content .source {
  margin-top: 16rpx;
  font-size: 24rpx;
  color: #999;
}
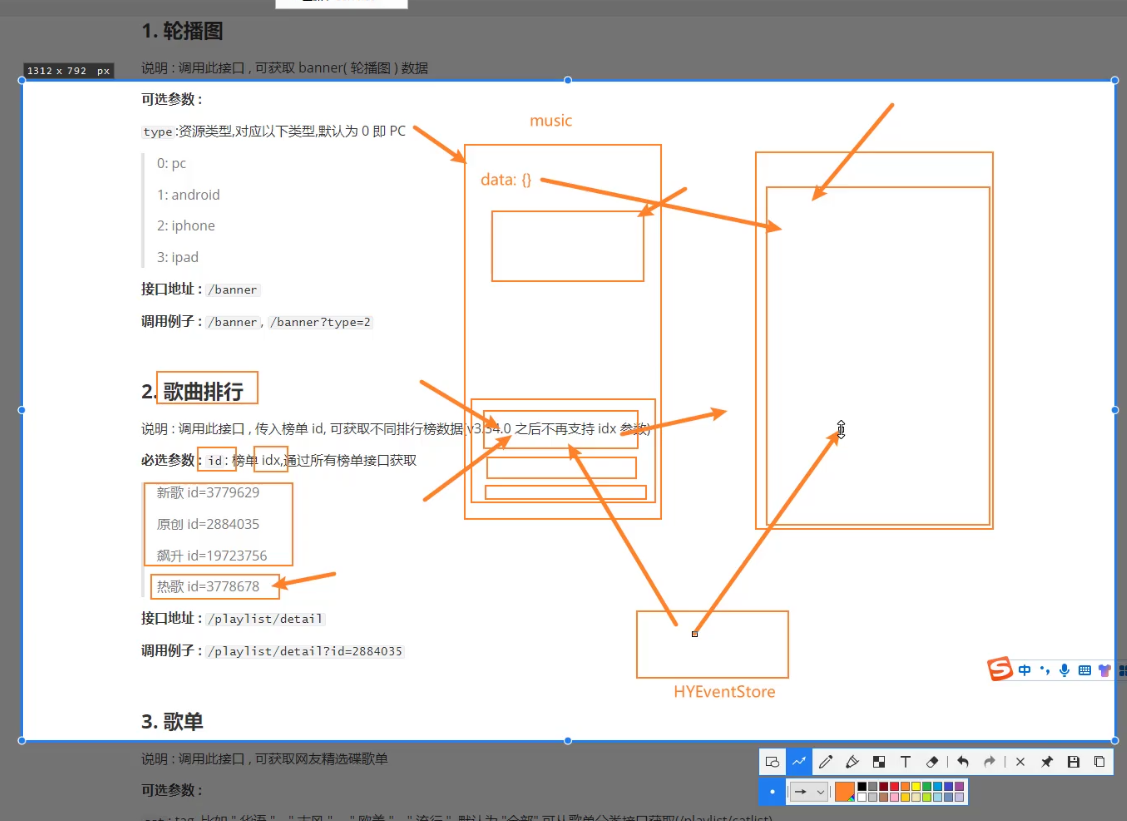
02_(掌握)小程序中的数据共享-HYEventStore使
数据共享
更多页面的数据共享
1.创建更多页面
detail-song
2.跳转到更多页面–》两个页面之间的数据共享(app.globalData–但是不会响应式)-》也没有其他好的方式
可以使用老师自己封装的一个数据共享的库–》hy-event-store -》hy-event-bus
 // 界面的事件监听方法
  onSearchClick() {
    wx.navigateTo({url: '/pages/detail-search/detail-search'})
  },
使用hy-event-store库
0.创建package.json文件
npm init -y
1.安装
npm install hy-event-store
2.使用
// 通过commonJS导入依赖库
const { HYEventStore } = require("hy-event-store")
// node下面也可以使用axios库
const axios = require("axios")

//  创建实例
const userStore = new HYEventStore({
  // 共享的数据
  state: {
    name: "why",
    age: 18,

    banners: [],
    recommends: []
  },
  // 如果数据来自服务器,我们可以通过action里面发送网络请求
  actions: {
    // ctx对应的就是state
    fetchHomeMultidataAction(ctx) {
      axios.get("http://123.207.32.32:8000/home/multidata").then(res => {
        // 通过ctx修改state里面的数据
        ctx.banners = res.data.data.banner.list
      })
    }
  }
})


// aaa.js中使用共享的数据
// 监听name的变化, 一旦name发生变化-》回调第二个参数函数,
// userStore.onState("name", (value) => {
//   console.log("name:", value);
// })
// userStore.onState("banners", (value) => {
//   console.log("banners:", value)
// })

// 同时监听多个数据的变化 这里面的value是个对象
userStore.onStates(["name", "banners"], (value) => {
  console.log(value.name);
  // 只改变发生改变的数据
  console.log(value.banners);
})

// bbb.js改变数据
// setState修改数据
setTimeout(() => {
  userStore.setState("name", "kobe")
  // 发起网络请求通过dispatch发送fetchHomeMultidataAction的方法
  // userStore.dispatch("fetchHomeMultidataAction")
}, 2000)
03_(掌握)小程序中的数据共享-推荐歌曲数据共享
数据共享
我们首先要思考那些数据是需要数据共享的
0.创建文件夹store用来存储共享的数据
创建recommendStore.js
import { HYEventStore } from "hy-event-store"
import { getPlaylistDetail } from "../services/music"

const recommendStore = new HYEventStore({
  state: {
    recommendSongInfo: {}
  },
  actions: {
    fetchRecommendSongsAction(ctx) {
      getPlaylistDetail(3778678).then(res => {
        ctx.recommendSongInfo = res.playlist
      })
    }
  }
})

export default recommendStore
1.安装 -》构建
npm install hy-event-store
2.封装共享数据
import { HYEventStore } from "hy-event-store"
import { getPlaylistDetail } from "../services/music"

const recommendStore = new HYEventStore({
  state: {
    recommendSongs: {}
  },
  actions: {
    fetchRecommendSongsAction(ctx) {
      getPlaylistDetail(3778678).then(res => {
        console.log(res);
        ctx.recommendSongs = res.playlist.tracks
      })
    }
  }
})

export default recommendStore
3.使用共享的数据,监听共享的数据,改变
import recommendStore from "../../store/recommendStore"
  data: {
    recommendSongs: []
  },


onLoad(){
    // 发起action
    recommendStore.dispatch("fetchRecommendSongsAction")
     // 监听数据发生改变
    recommendStore.onState("recommendSongs", (value)=>{
       //只要前六条数据
      this.setData({ recommendSongs: value.slice(0,6)})
    })
}
一个页面去使用共享数据的步骤
1…detail-song在使用页面的引入
一旦页面销毁就销毁数据(取消数据的监听)
import recommendStore from "../../store/recommendStore"

Page({
  data: {
    song: []
  },
  onLoad() {
 	recommendStore.onState("recommendSongs",this.handleRecomendSongs)
  },
  handleRecomendSongs(value){
    this.setData({song:value})
  },
  onUnload(){
    recommendStore.offState("recommendSongs",this.handleRecomendSongs)
  }

})

如果我们的baseUrl需要经常变化,我们可以封装一个文件夹config.js
// export const baseURL = "https://coderwhy-music.vercel.app/"
export const baseURL = "http://codercba.com:9002"

// 封装成类 -> 实例
import { baseURL } from "./config"

export const hyRequest = new HYRequest(baseURL)
简单的优化
import { HYEventStore } from "hy-event-store"
import { getPlaylistDetail } from "../services/music"

const recommendStore = new HYEventStore({
  state: {
    recommendSongs: {}
  },
  actions: {
    fetchRecommendSongsAction(ctx) {
      getPlaylistDetail(3778678).then(res => {
        console.log(res);
        ctx.recommendSongs = res.playlist
      })
    }
  }
})

export default recommendStore

data:{
   recommendSongs: [],
},
onLoad() {
	// 发起action
	recommendStore.dispatch("fetchRecommendSongsAction")
	// 监听数据发生改变
	recommendStore.onState("recommendSongs", this.handleRecommendSongs)
}
  // ====================== 从Store中获取数据 ======================
  handleRecommendSongs(value) {
    if (!value.tracks) return
    this.setData({
      recommendSongs: value.tracks.slice(0, 6)
    })
  },
04_(掌握)音乐页面-热门歌单的数据请求和展示
热门歌单的数据请求和展示
0.封装请求接口方法
export function getSongMenuList(cat = "全部", limit = 6, offset = 0) {
  return hyRequest.get({
    url: "/top/playlist",
    data: {
      cat,
      limit,
      offset
    }
  })
}
1.发起网络请求
import { getSongMenuList } from "../../services/music"

 data: {
    // 歌单数据
    hotMenuList: [],
 }

  onLoad() {
      this.fetchSongMenuList()
  }
  async fetchSongMenuList() {
    getSongMenuList().then(res => {
      this.setData({
        hotMenuList: res.playlists
      })
    })
  },
2.将展示的页面需要的部分封装成组件 menu-item
2.1创建组件menu-item
2.2在使用组件的地方注册
"menu-item": "/components/menu-item/menu-item",
2.3使用组件,将请求的数据传递给子组件
<menu-area title="热门歌单" menuList="{{hotMenuList}}"/>
2.4子组件通过properties接受父组件传递过来的数据
// components/menu-item/menu-item.js
Component({
  properties: {
    itemData: {
      type: Object,
      value: {}
    }
  },
  methods: {
    onMenuItemTap() {
      const id = this.properties.itemData.id
      wx.navigateTo({
        url: `/pages/detail-song/detail-song?type=menu&id=${id}`,
      })
    }
  }
})
2.5展示结构
<!--components/menu-item/menu-item.wxml-->
<wxs src="/utils/format.wxs" module="fmt"></wxs>
<view class="menu-item" bindtap="onMenuItemTap">
  <view class="top">
    <image class="image" src="{{itemData.coverImgUrl}}" mode="widthFix"></image>
    <view class="count">{{fmt.formatCount(itemData.playCount)}}</view>
  </view>
  <view class="bottom">
    {{itemData.name}}
  </view>
</view>
2.5.1格式化
<wxs src="/utils/format.wxs" module="fmt"></wxs>
2.6样式
/* components/menu-item/menu-item.wxss */
.menu-item {
  display: inline-block;
  width: 100%;
}

.top {
  position: relative;
}

.top .image {
  width: 100%;
  border-radius: 12rpx;
  background-size: cover;
}

.top .count {
  position: absolute;
  right: 0;
  bottom: 10rpx;
  color: #fff;
  font-size: 22rpx;
  border-radius: 12rpx;
  padding: 6rpx 10rpx;
  background: rgba(0,0,0, .5);
}

.menu-item .bottom {
  width: 100%;
  font-size: 26rpx;

  /* 显示两行 */
  white-space: normal;
  overflow: hidden;
  text-overflow: ellipsis;
  display: -webkit-box;
  -webkit-line-clamp: 2;
  -webkit-box-orient: vertical;
}
3.页面结构
<!-- <view class="hot-menu">
  <area-header title="热门歌单"/>
  <scroll-view
    class="liste"
    scroll-x
    enable-flex
    style="width: {{screenWidth}}px;"
  >
    <block wx:for="{{hotMenuList}}" wx:key="id">
      <view class="item">
        <menu-item itemData="{{item}}"/>
      </view>
    </block>
  </scroll-view>
</view> -->
4.页面样式
/* pages/main-music/main-music.wxss */
page {
  --search-background-color: #fff;
  --search-padding: 10px 0;

  box-sizing: border-box;
  padding: 0 24rpx;
  background-color: #fafafa;
}

/* .van-search__content {
  background-color: #fff !important;
} */

/* 轮播图的样式 */
.banner {
  border-radius: 12rpx;
  overflow: hidden;
  /* height: 260rpx; */
}

.banner-image {
  width: 100%;
}

/*  */
.liste {
  display: flex;
  width: 100%;
}

.liste .item {
  flex-shrink: 0;
  width: 220rpx;
  margin-right:20rpx ;
}
05_(掌握)音乐页面-热门歌单的滚动细节调整
热门歌单的滚动边缘细节调整
动态获取屏幕宽度
最重要的
<scroll-view
    class="list"
    scroll-x
    enable-flex
    style="width: {{screenWidth}}px;"
  >
1.设置初始默认宽度
screenWidth: 375,
const app = getApp()
data:{
     screenWidth: 375,
}
onLoad(){
    // 获取屏幕的尺寸
	this.setData({ screenWidth: app.globalData.screenWidth })
}
3.app.js
// app.js
App({
  globalData: {
    screenWidth: 375,
    screenHeight: 667
  },
  onLaunch() {
    // 1.获取设备的信息
    wx.getSystemInfo({
      success: (res) => {
        this.globalData.screenWidth = res.screenWidth
        this.globalData.screenHeight = res.screenHeight
      },
    })
  }
})
4.样式
/*  */
.liste {
  /* display: flex; */
  margin-left: -24rpx;
  white-space: nowrap;
}

.liste .item {
  display: inline-block;
  /* flex-shrink: 0; */
  width: 220rpx;
  margin-left:24rpx ;
}
.liste .item:last-of-type {
  margin-right:24rpx ;
}
06_(掌握)音乐页面-歌单区域的封装和推荐歌单展示
热门歌单和推荐歌单基本一样,所以我们可以抽成一个组件
menu-area
0.创建menu-area文件夹
1.注册使用
"menu-area": "/components/menu-area/menu-area",
<menu-area title="热门歌单" menuList="{{hotMenuList}}"/>
 recMenuList: [],

  // },
  async fetchSongMenuList() {
    getSongMenuList().then(res => {
      this.setData({ hotMenuList: res.playlists })
    })
    getSongMenuList("华语").then(res => {
      this.setData({ recMenuList: res.playlists })
    })
  },
4.子组件
// components/menu-area/menu-area.js
const app = getApp()

Component({
  properties: {
    title: {
      type: String,
      value: "默认歌单"
    },
    menuList: {
      type: Array,
      value: []
    }
  },
  data: {
    screenWidth: 375
  },

  lifetimes: {
    attached() {
      this.setData({ screenWidth: app.globalData.screenWidth })
    }
  },

  methods: {
    onMenuMoreClick() {
      wx.navigateTo({
        url: '/pages/detail-menu/detail-menu',
      })
    }
  }
})

{
  "component": true,
  "usingComponents": {
    "area-header": "/components/area-header/area-header",
    "menu-item": "/components/menu-item/menu-item"
  }
}

<!--components/menu-area/menu-area.wxml-->
<view class="menu" wx:if="{{menuList.length}}">
  <area-header title="{{title}}" bind:moreclick="onMenuMoreClick"/>
  <scroll-view
    class="list"
    scroll-x
    enable-flex
    style="width: {{screenWidth}}px;"
  >
    <block wx:for="{{menuList}}" wx:key="id">
      <view class="item">
        <menu-item itemData="{{item}}"/>
      </view>
    </block>
  </scroll-view>
</view>

/* components/menu-area/menu-area.wxss */
.list {
  /* display: flex; */
  margin-left: -24rpx;
  white-space: nowrap;
}

.list .item {
  display: inline-block;
  /* flex-shrink: 0; */
  width: 220rpx;
  margin-left: 24rpx;
}

.list .item:last-of-type {
  margin-right: 24rpx;
}
07_(掌握)歌单页面-所有的歌单数据请求和展示
更多页面
1.创建页面 detail-menu
2.封装请求接口方法
export function getSongMenuTag() {
  return hyRequest.get({
    url: "/playlist/hot"
  })
}
3.组件书写
// pages/detail-menu/detail-menu.js
import { all } from "underscore"
import { getSongMenuTag, getSongMenuList } from "../../services/music"

Page({
  data: {
    songMenus: []
  },
  onLoad() {
    this.fetchAllMenuList()
  },
  // 发送网络请求
  async fetchAllMenuList() {
    // 1.获取tags
    const tagRes = await getSongMenuTag()
    const tags = tagRes.tags

    // 2.根据tags去获取对应的歌单
    const allPromises = []
    for (const tag of tags) {
      const promise = getSongMenuList(tag.name)
      allPromises.push(promise)
    }

    // 3.获取到所有的数据之后, 调用一次setData
    Promise.all(allPromises).then(res => {
      this.setData({ songMenus: res })
    })
  }
})

{
  "usingComponents": {
    "area-header": "/components/area-header/area-header",
    "menu-item": "/components/menu-item/menu-item"
  }
}

<!--pages/detail-menu/detail-menu.wxml-->
<view class="all-menu">
  <block wx:for="{{songMenus}}" wx:key="cat">
    <view class="cat">
      <area-header title="{{item.cat}}" hasMore="{{false}}"/>
      <view class="list">
        <block wx:for="{{item.playlists}}" wx:key="id" wx:for-item="iten">
          <view class="iten">
            <menu-item itemData="{{iten}}"/>
          </view>
        </block>
      </view>
    </view>
  </block>
</view>


/* pages/detail-menu/detail-menu.wxss */
page {
  box-sizing: border-box;
  padding: 0 20rpx;
}

.list {
  display: flex;
  justify-content: space-between;
  flex-wrap: wrap;
}

.list .iten {
  width: 49%;
}
08_(掌握)音乐页面-榜单数据的管理和数据请求
巅峰榜—榜单数据的管理和数据请求
思考对于大数据量的数据,应该放到哪里存储–如果是页面中,大数量的数据请求小程序是不支持的,加载缓慢
应该通过共享数据放到Store中保存数据,获取的数据只需要从Store获取即可
0.初始页面展示结构
<!-- 5.巅峰榜 -->
<view class="ranking">
  <area-header title="巅峰榜" hasMore="{{false}}"/>
</view>
1.创建新的store(榜单)
rankingStore.js
import { HYEventStore } from "hy-event-store"
import { getPlaylistDetail } from "../services/music"

export const rankingsMap = {
  newRanking: 3779629,
  originRanking: 2884035,
  upRanking: 19723756
}
const rankingStore = new HYEventStore({
  // 保存数据的位置
  state: {
    newRanking: {},
    originRanking: {},
    upRanking: {}
  },
  // 发起的网络请求的位置
  actions: {
    fetchRankingDataAction(ctx) {
      // 通过遍历对象的方式请求数据
      for (const key in rankingsMap) {
        const id = rankingsMap[key]
        getPlaylistDetail(id).then(res => {
          ctx[key] = res.playlist
        })
      }
    }
  }
})

export default rankingStore
2.在进入页面的时候发起请求
import rankingStore from "../../store/rankingStore"

onLoad() {
	rankingStore.dispatch("fetchRankingDataAction")
}
对监听数据发生改变的函数onState进行优化
onLoad() {
	recommendStore.onState("recommendSongs", this.handleRecommendSongs)
}
  // ====================== 从Store中获取数据 ======================
handleRecommendSongs(value) {
    if (!value.tracks) return
    this.setData({
      recommendSongs: value.tracks.slice(0, 6)
    })
  },

 onUnload() {
    recommendStore.offState("recommendSongs", this.handleRecommendSongs)
  }
09_(掌握)音乐页面-绑定数据在页面中监听和获取
监听三个榜单的数据,进行回调
0.发起请求,处理回调----类似于首页可以不用在跳转页面的时候销毁,按规范来可以进行销毁
onLoad() {
	rankingStore.onState("newRanking", this.handleNewRanking)
    rankingStore.onState("originRanking", this.handleOriginRanking)
    rankingStore.onState("upRanking", this.handleUpRanking)
 }
  handleNewRanking(value) {
    // console.log("新歌榜:", value);
    if (!value.name) return
    this.setData({ isRankingData: true })
    const newRankingInfos = { ...this.data.rankingInfos, newRanking: value }
    this.setData({ rankingInfos: newRankingInfos })
  },
  handleOriginRanking(value) {
    // console.log("原创榜:", value);
    if (!value.name) return
    this.setData({ isRankingData: true })
    const newRankingInfos = { ...this.data.rankingInfos, originRanking: value }
    this.setData({ rankingInfos: newRankingInfos })
  },
  handleUpRanking(value) {
    // console.log("飙升榜:", value);
    if (!value.name) return
    this.setData({ isRankingData: true })
    const newRankingInfos = { ...this.data.rankingInfos, upRanking: value }
    this.setData({ rankingInfos: newRankingInfos })
  },

类似于首页可以不用在跳转页面的时候销毁
  onUnload() {
    recommendStore.offState("recommendSongs", this.handleRecommendSongs)
    rankingStore.offState("newRanking", this.handleNewRanking)
    rankingStore.offState("originRanking", this.handleOriginRanking)
    rankingStore.offState("upRanking", this.handleUpRanking)
  }
1.data初始数据
data: {
// 巅峰榜数据
    isRankingData: false,
    rankingInfos: {}
}
2.页面结构展示
[外链图片转存失败,源站可能有防盗链机制,建议将图片保存下来直接上传(img-3coJfmff-1675305387684)(https://qny.xjc1016jzy.love/blog/applet/image-20230129093401503.png)]
<!-- 5.巅峰榜 -->
<view class="ranking" wx:if="{{isRankingData}}">
  <area-header title="巅峰榜" hasMore="{{false}}"/>
  <view class="ranking-list">
    <block wx:for="{{rankingInfos}}" wx:key="id">
      <view>{{item.name}}</view>
    </block>
  </view>
</view>
10_(掌握)音乐页面-榜单数据的展示和Item组件封装
每个榜单数据的展示又是一个组件
封装组件的全过程
0.使用就需要注册
"ranking-item": "/components/ranking-item/ranking-item"
1.新建组件
ranking-item
2.父组件结构展示,将数据传递进去
<!-- 5.巅峰榜 -->
<view class="ranking" wx:if="{{isRankingData}}">
  <area-header title="巅峰榜" hasMore="{{false}}"/>
  <view class="ranking-list">
    <block wx:for="{{rankingInfos}}" wx:key="id">
      <ranking-item itemData="{{item}}" key="{{index}}"/>
    </block>
  </view>
</view>
3.子组件对数据进行接收,展示
<!--components/ranking-item/ranking-item.wxml-->
<wxs src="/utils/format.wxs" module="fmt"></wxs>
<view class="ranking-item" bindtap="onRankingItemTap">
  <view class="content">
    <view class="name">{{itemData.name}}</view>
    <view class="list">
      <block wx:for="{{3}}" wx:key="*this">
        <view class="item">
          <text>{{item + 1}}.</text>
          <text>{{itemData.tracks[item].name}}</text>
          <text class="singer"> - {{itemData.tracks[item].ar[0].name}}</text>
        </view>
      </block>
    </view>
  </view>
  <view class="album">
    <image class="image" src="{{itemData.coverImgUrl}}"></image>
    <view class="count">{{fmt.formatCount(itemData.playCount)}}</view>
  </view>
</view>


// components/ranking-item/ranking-item.js
Component({
  properties: {
    itemData: {
      type: Object,
      value: {}
    },
    key: {
      type: String,
      value: "newRanking"
    }
  },
  methods: {
    onRankingItemTap() {
      const key = this.properties.key
      wx.navigateTo({
        url: `/pages/detail-song/detail-song?type=ranking&key=${key}`,
      })
    }
  }
})

{
  "component": true,
  "usingComponents": {}
}

/* components/ranking-item/ranking-item.wxss */
.ranking-item {
  display: flex;
  justify-content: space-between;
  background-color: #eee;
  border-radius: 12rpx;
  overflow: hidden;
  margin-top: 20rpx;
}

.content {
  padding: 24rpx;
  overflow: hidden;
}

.content .name {
  font-size: 34rpx;
}

.content .list {
  margin-top: 10rpx;
  font-size: 24rpx;
}

.content .list .item {
  color: #333;
  margin-top: 6rpx;

  white-space: nowrap;
  text-overflow: ellipsis;
  overflow: hidden;
}

.content-list-item .singer {
  color: #999;
}

.album {
  position: relative;
  display: flex;
}

.album .image {
  width: 220rpx;
  height: 220rpx;
  background-size: cover;
}

.album .count {
  position: absolute;
  right: 0;
  bottom: 0rpx;
  color: #fff;
  font-size: 22rpx;
  border-radius: 12rpx;
  padding: 6rpx 10rpx;
  background: rgba(0,0,0,.5);
}
4.通过wxs–对数字进行优化 ,对多个歌手进行优化
11_(了解)音乐页面-从Store中获取数据函数绑定形式
对处理的函数进行优化
高阶函数的优化
方式一、
// rankingStore.onState("newRanking", this.getRankingHanlder("newRanking"))
// rankingStore.onState("originRanking", this.getRankingHanlder("originRanking"))
// rankingStore.onState("upRanking", this.getRankingHanlder("upRanking"))


// getRankingHanlder(ranking) {
  //   return value => {
  //     const newRankingInfos = { ...this.data.rankingInfos, [ranking]: value }
  //     this.setData({ rankingInfos: newRankingInfos })
  //   }
  // },
方式二、
export const rankingsMap = {
  newRanking: 3779629,
  originRanking: 2884035,
  upRanking: 19723756
}

import  { rankingsMap } from "../../store/rankingStore"

// for (const key in rankingsMap) {
//   rankingStore.onState(key, this.getRankingHanlder(key))
// }

// getRankingHanlder(ranking) {
  //   return value => {
  //     const newRankingInfos = { ...this.data.rankingInfos, [ranking]: value }
  //     this.setData({ rankingInfos: newRankingInfos })
  //   }
  // },
12_(掌握)歌曲详情-点击不同的榜单获取不同的数据
页面detail-song
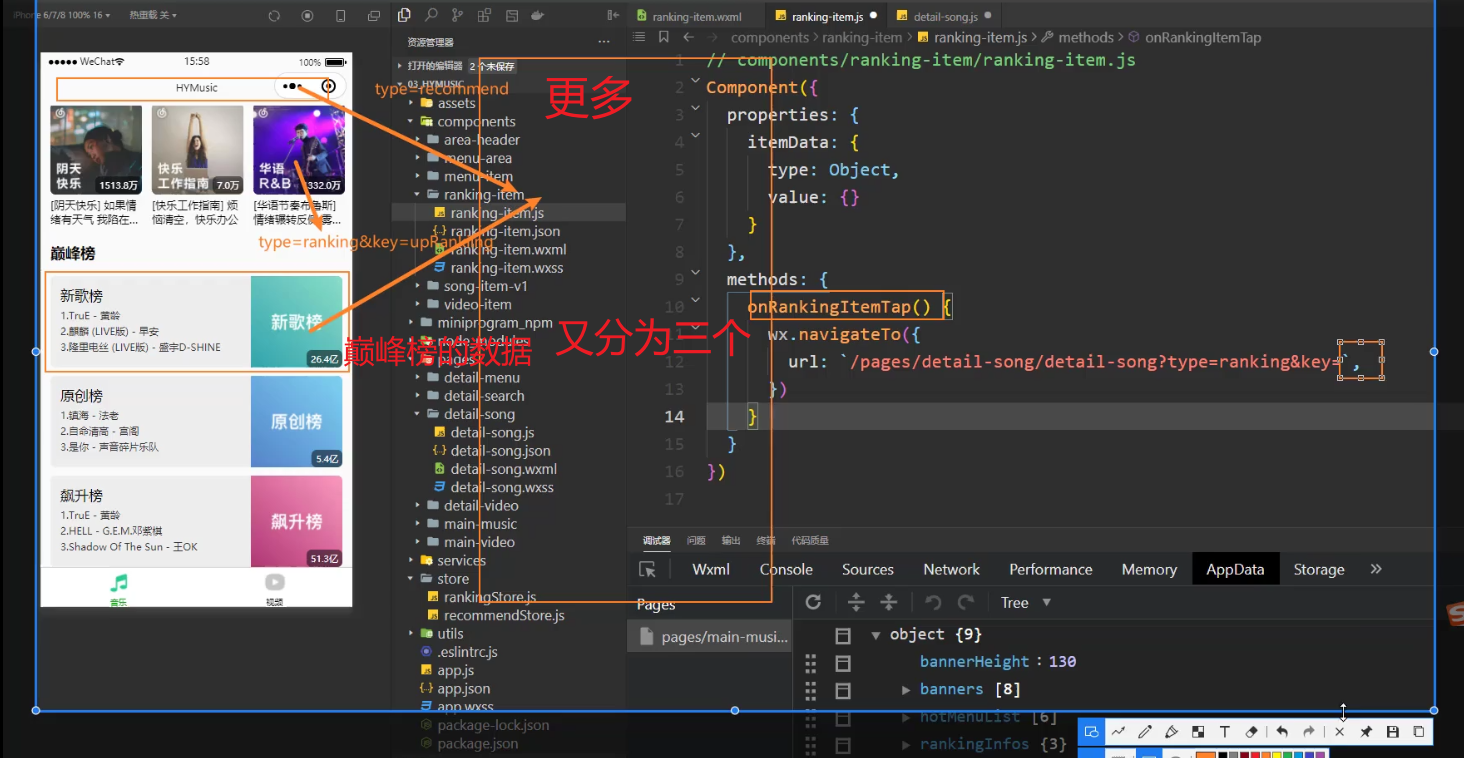
点击不同的榜单获取不同的数据 将key–index索引传入子组件,遍历的索引就是key ranking-item通过properties接收
监听点击事件onRankingItemTap 根据不同的参数,请求不同数据,跳转界面 detail-song
main-music.wxml
<ranking-item itemData="{{item}}" key="{{index}}"/>

ranking-item.wxml
<view class="ranking-item" bindtap="onRankingItemTap">

// components/ranking-item/ranking-item.js
Component({
  properties: {
    itemData: {
      type: Object,
      value: {}
    },
    key: {
      type: String,
      value: "newRanking"
    }
  },
  methods: {
    onRankingItemTap() {
      const key = this.properties.key
      console.log(key);
      wx.navigateTo({
        url: `/pages/detail-song/detail-song?type=ranking&key=${key}`,
      })
    }
  }
})
detail-song界面
<!--pages/detail-song/detail-song.wxml-->
<view class="title">{{songInfo.name}}</view>
<view class="song-list">
  <block wx:for="{{songInfo.tracks}}" wx:key="id">
      <view>{{item.name}}</view>
  </block>
</view>

// pages/detail-song/detail-song.js
import rankingStore from "../../store/rankingStore"

Page({
  data: {
    type: "ranking",
    key: "newRanking",

    songInfo: {}
  },
  onLoad(options) {
    // 1.确定获取数据的类型
    // type: ranking -> 榜单数据
    // type: recommend -> 推荐数据
    const type = options.type
    // this.data.type = type
    this.setData({ type })

    // 获取store中榜单数据
    if (type === "ranking") {
      const key = options.key
      this.data.key = key
      rankingStore.onState(key, this.handleRanking)
    }
  },

  handleRanking(value) {
    this.setData({ songInfo: value })
     wx.setNavigationBarTitle({
      title: value.name,
    })
  },

  onUnload() {
    if (this.data.type === "ranking") {
      rankingStore.offState(this.data.key, this.handleRanking)
    }
  }
})

/* pages/detail-song/detail-song.wxss */
.title {
  margin: 20rpx 30rpx 0;
  font-size: 40rpx;
  font-weight: 700;
}

.song-list {
  padding: 20rpx;
  padding-top: 0;
}
里面的样式依然需要自定义组件song-item-v2
13_(掌握)歌曲详情-自定义Item展示列表数据
自定义组件song-item-v2
0.创建组件song-item-v2
1.注册
"song-item-v2": "/components/song-item-v2/song-item-v2",
2.使用
<!--pages/detail-song/detail-song.wxml-->
<view class="header" wx:if="{{type === 'menu' && songInfo.name}}">
  <menu-header songInfo="{{songInfo}}"/>
</view>
<view class="title" wx:else>{{songInfo.name}}</view>
<view class="song-list">
  <block wx:for="{{songInfo.tracks}}" wx:key="id">
    <song-item-v2 itemData="{{item}}" index="{{index+1}}"/>
  </block>
</view>
3.子组件接收数据
// components/song-item-v2/song-item-v2.js
Component({
  properties: {
    itemData: {
      type: Object,
      value: {}
    },
    index: {
      type: Number,
      value: -1
    }
  }
})

<!--components/song-item-v2/song-item-v2.wxml-->
<view class="item">
  <view class="index">{{index}}</view>
  <view class="info">
    <view>{{itemData.name}}</view>
    <view class="source">
      <image class="icon" src="/assets/images/icons/sq_icon.png"></image>
      <text>{{itemData.ar[0].name}}</text>
    </view>
  </view>
</view>

/* components/song-item-v2/song-item-v2.wxss */
.item {
  display: flex;
  align-items: center;
  margin: 36rpx 0 10rpx;
}

.index {
  font-size: 30rpx;
  padding: 12rpx;
}

.info {
  flex: 1;
  margin-left: 16rpx;
}

.info .name {
  font-size: 30rpx;
}

.info .source {
  display: flex;
  align-items: center;
  font-size: 24rpx;
  color: #666;
  margin-top: 10rpx;
}

.source .icon {
  width: 38rpx;
  height: 22rpx;
  margin-right: 10rpx;
}
14_(掌握)歌曲详情-推荐歌曲的点击和数据展示
针对于更多detail-song字段的跳转
main-music
<area-header title="推荐歌曲" bind:moreclick="onRecommendMoreClick"/>

 onRecommendMoreClick() {
    wx.navigateTo({
      url: '/pages/detail-song/detail-song?type=recommend',
    })
  },
detail-song逻辑
// pages/detail-song/detail-song.js
import recommendStore from "../../store/recommendStore"
import rankingStore from "../../store/rankingStore"

Page({
  data: {
    type: "ranking",
    key: "newRanking",

    songInfo: {}
  },
  onLoad(options) {
    // 1.确定获取数据的类型
    // type: ranking -> 榜单数据
    // type: recommend -> 推荐数据
    const type = options.type
    // this.data.type = type
    this.setData({ type })

    // 获取store中榜单数据
    if (type === "ranking") {
      const key = options.key
      this.data.key = key
      rankingStore.onState(key, this.handleRanking)
    } else if (type === "recommend") {
      recommendStore.onState("recommendSongInfo", this.handleRanking)
    }
  },


  handleRanking(value) {
    if (this.data.type === "recommend") {
      value.name = "推荐歌曲"
    }
    this.setData({ songInfo: value })
    wx.setNavigationBarTitle({
      title: value.name,
    })
  },

  onUnload() {
    if (this.data.type === "ranking") {
      rankingStore.offState(this.data.key, this.handleRanking)
    } else if (this.data.type === "recommend") {
      recommendStore.offState("recommendSongInfo", this.handleRanking)
    }
  }
})
针对于之前的recommendStore.js 我们应该保存的是 recommendSongInfo: {} 而不是 recommendSongs: {},保存的是整个对象
记得修改之后,首页使用的监听地方也要修改
import { HYEventStore } from "hy-event-store"
import { getPlaylistDetail } from "../services/music"

const recommendStore = new HYEventStore({
  state: {
    recommendSongInfo: {}
  },
  actions: {
    fetchRecommendSongsAction(ctx) {
      getPlaylistDetail(3778678).then(res => {
        ctx.recommendSongInfo = res.playlist
      })
    }
  }
})

export default recommendStore
15_(掌握)歌曲详情-点击歌单跳转并且展示数据
点击歌单跳转并且展示数据需要在menu-item组件中根元素中绑定点击事件
<view class="menu-item" bindtap="onMenuItemTap">

 methods: {
    onMenuItemTap() {
      const id = this.properties.itemData.id
      wx.navigateTo({
        url: `/pages/detail-song/detail-song?type=menu&id=${id}`,
      })
    }
  }
回到detail-song页面 通过id发起网络请求
// pages/detail-song/detail-song.js
import recommendStore from "../../store/recommendStore"
import rankingStore from "../../store/rankingStore"
import { getPlaylistDetail } from "../../services/music"

Page({
  data: {
    type: "ranking",
    key: "newRanking",
    id: "",

    songInfo: {}
  },
  onLoad(options) {
    // 1.确定获取数据的类型
    // type: ranking -> 榜单数据
    // type: recommend -> 推荐数据
    const type = options.type
    // this.data.type = type
    this.setData({ type })

    // 获取store中榜单数据
    if (type === "ranking") {
      const key = options.key
      this.data.key = key
      rankingStore.onState(key, this.handleRanking)
    } else if (type === "recommend") {
      recommendStore.onState("recommendSongInfo", this.handleRanking)
    } else if (type === "menu") {
      const id = options.id
      this.data.id = id
      this.fetchMenuSongInfo()
    }
  },

  async fetchMenuSongInfo() {
    const res = await getPlaylistDetail(this.data.id)
    this.setData({ songInfo: res.playlist })
  },

  handleRanking(value) {
    // if (this.data.type === "recommend") {
    //   value.name = "推荐歌曲"
    // }
    this.setData({ songInfo: value })
    wx.setNavigationBarTitle({
      title: value.name,
    })
  },

  onUnload() {
    if (this.data.type === "ranking") {
      rankingStore.offState(this.data.key, this.handleRanking)
    } else if (this.data.type === "recommend") {
      recommendStore.offState("recommendSongInfo", this.handleRanking)
    }
  }
})
16_(掌握)歌曲详情-歌单的头部展示和音乐页面优化
优化歌单的头部展示和音乐页面优化
0.将头部封装成组件menu-header
// components/menu-header/menu-header.js
Component({
  properties: {
    songInfo: {
      type: Object,
      value: {}
    }
  }
})

<!--components/menu-header/menu-header.wxml-->
<wxs src="/utils/format.wxs" module="fmt"></wxs>
<view class="content">
  <!-- 背景 -->
  <image class="bg-image" mode="aspectFill" src="{{songInfo.coverImgUrl}}"></image>
  <view class="bg-cover"></view>

  <!-- 内容 -->
  <view class="album">
    <image class="image" src="{{songInfo.coverImgUrl}}"></image>
    <view class="info">
      <view class="title">{{songInfo.name}}</view>
      <view class="anthor">
        <image class="avatar" mode="aspectFill" src="{{songInfo.creator.avatarUrl}}"></image>
        <text class="nickname">{{songInfo.creator.nickname}}</text>
      </view>
      <view class="desc">简介: {{songInfo.description}}</view>
    </view>
  </view>

  <view class="operation">
    <view class="favor item">
      <image class="icon" mode="widthFix" src="/assets/images/icons/favor_icon.png"></image>
      <text class="text">{{fmt.formatCount(songInfo.subscribedCount)}}</text>
    </view>
    <view class="share item">
      <image class="icon" mode="widthFix" src="/assets/images/icons/share_icon.png"></image>
      <text class="text">分享</text>
    </view>
  </view>
</view>


/* components/menu-header/menu-header.wxss */
.content {
  position: relative;
  display: flex;
  flex-direction: column;
  height: 450rpx;
  color: #fff;
}

.content .bg-image {
  position: absolute;
  z-index: -1;
  top: 0;
  left: 0;
  width: 100%;
  height: 100%;
}

.content .bg-cover {
  position: absolute;
  z-index: -1;
  top: 0;
  left: 0;
  width: 100%;
  height: 100%;
  background-color: rgba(0,0,0,.5);
  backdrop-filter: blur(5px);
}

.album {
  display: flex;
  margin-top: 60rpx;
  padding: 0 50rpx;
}

.album .image {
  width: 220rpx;
  height: 220rpx;
  border-radius: 16rpx;
}

.album .info {
  position: relative;
  height: 220rpx;
  flex: 1;
  margin-left: 50rpx;
}

.album .anthor {
  margin-top: 20rpx;
  display: flex;
  align-items: center;
}

.album .anthor .avatar {
  width: 50rpx;
  height: 50rpx;
  border-radius: 25rpx;
}

.album .anthor .nickname {
  font-size: 24rpx;
  margin-left: 18rpx;
}

.album .info .desc {
  position: absolute;
  bottom: 0;
  left: 0;
  width: 100%;
  margin-top: 30rpx;
  font-size: 24rpx;
  display: inline-block;
  white-space: nowrap;
  overflow: hidden;
  text-overflow: ellipsis;
}

.operation {
  display: flex;
  justify-content: space-around;
  padding: 30rpx;
  margin-top: 30rpx;
}

.operation .item {
  display: flex;
  align-items: center;
}

.operation .item .icon {
  width: 48rpx;
  margin-right: 10rpx;
}

.operation .item .text {
  font-size: 28rpx;
}
1.使用组件需要注册
"menu-header": "/components/menu-header/menu-header"
2.使用组件
<!--pages/detail-song/detail-song.wxml-->
<view class="header" wx:if="{{type === 'menu' && songInfo.name}}">
  <menu-header songInfo="{{songInfo}}"/>
</view>
<view class="title" wx:else>{{songInfo.name}}</view>
<view class="song-list">
  <block wx:for="{{songInfo.tracks}}" wx:key="id">
    <song-item-v2 itemData="{{item}}" index="{{index+1}}"/>
  </block>
</view>
17_(理解)内容回顾和作业布置
第六章:内容回顾
一. 推荐歌曲
1.1. 音乐页面请求数据和展示数据
1.2. hy-event-store数据共享
1.3. 推荐数据Store的共享数据
二. 歌单展示
2.1. 获取歌单, 展示歌单
2.2. 滚动的样式调整
- width: 100% -> screenWidth -> app.globalData
- scroll-view -> flex -> margin-right
- dib -> display: inline-block
2.3. 封装menu-area组件
2.4. 点击更多展示歌单页面
- Promise.all
三. 巅峰榜
3.1. 在rankingStore请求和保存数据
3.2. 在music页面中获取Store中数据
3.3. 封装组件进行展示数据
四. 歌单详情
4.1. 排行榜数据的共享和展示
4.2. 推荐歌曲的共享和展示
4.3. 歌单详情的id-请求数据-展示数据
4.4. 歌单的header的封装和展示
五. 音乐页面的优化
- 如果没有数据, 那么先不展示对应的区域
- wx:if的判断